Materials, Technique & Texture
Following on from the initial sampling exercise I decided to take my experiments with felting further. Having researched felting artists I liked the way in which Anneke Copier creates surface texture in felt and uses it to develop sculptural pieces. I also find the work felted works of Dagmar Binder offer inspiration for colour, shape and texture. Yukako Sorai has a unique approach to structural felts and colour, the colours and shapes of Jana Kuchalski.
For technique and texture in media other than felt, I have found inspiration in the work of Fay Maxwell, Carol Ann Waugh and the fasincatingly skillful and beautiful silk carving of Petra Voegtle.
Colour
The briefest glance through my chosen artists will show a marked preference for bold, rich colours; from the vibrant crochet of Olek and Joana Vasconcelos to the felting work of Jana Muchalski and Yukako Sorai. One of my favourite artists is Kaffe Fassett. The extent of his media range is amazing and so varied, however, consistent throughout his work is his inspirational use of colour. Having seen Fassett exhibitions and attended one of his lectures, it is impossible not to be astounded by someone who can make colour work so powerfully. Other artists who sate my need for colour include; bargello specialist and stitching artist Joyce Petschek; master weaver Maximo Laura; fashion designer Zandra Rhodes
However, I would like to step outside my usual comfort zone and, inspired by the subtle, natural tones of my ancient art spirals, I plan to explore both bright and more subdued colours to see how each interacts with the other aspects of my samples.
Turning to the next set of samples, I have developed and expanded on the felting work which was my preferred medium from the initial sampling set. To give the samples more focus, I chose to work with the spiral shapes from ancient carvings and the slashing and cutting techniques used by Fay Maxwell, Anneke Copier and other artists – aspects that I found most stimulating during my research and refinement process. These are my processes, results, thoughts and outcomes:
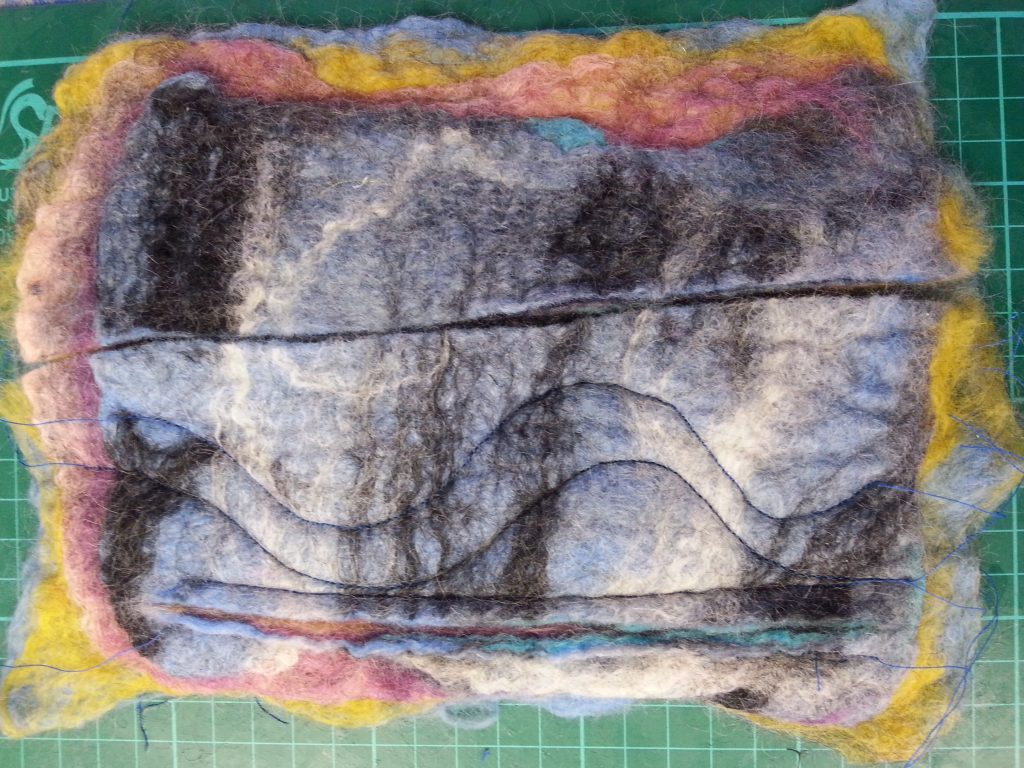
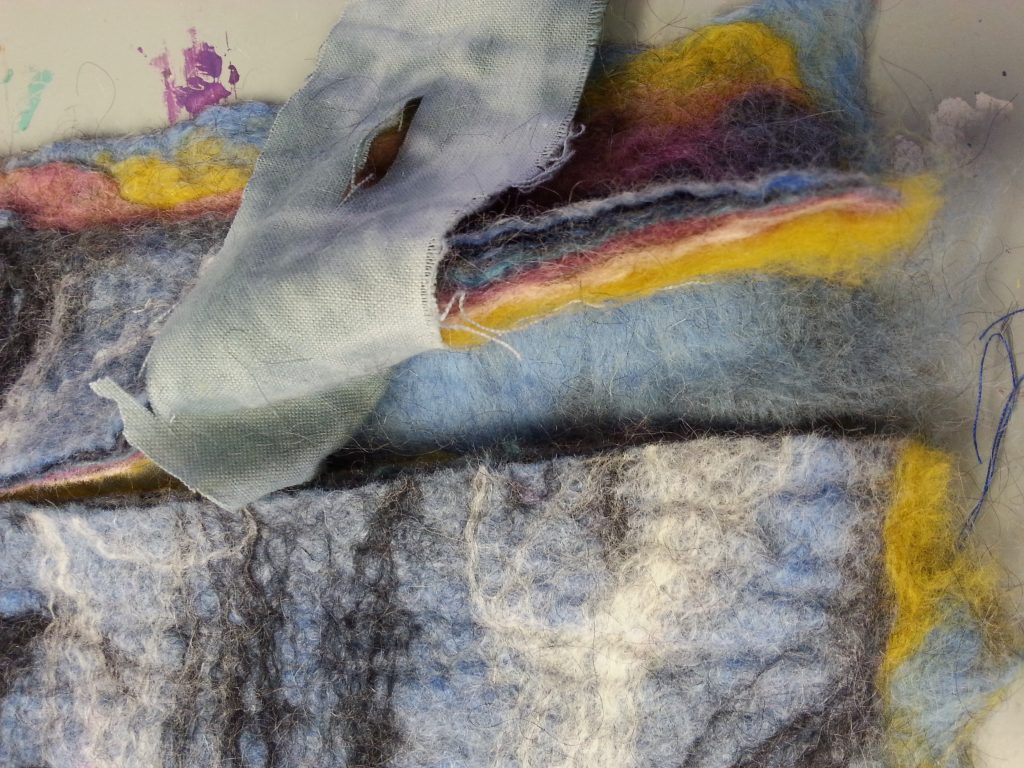
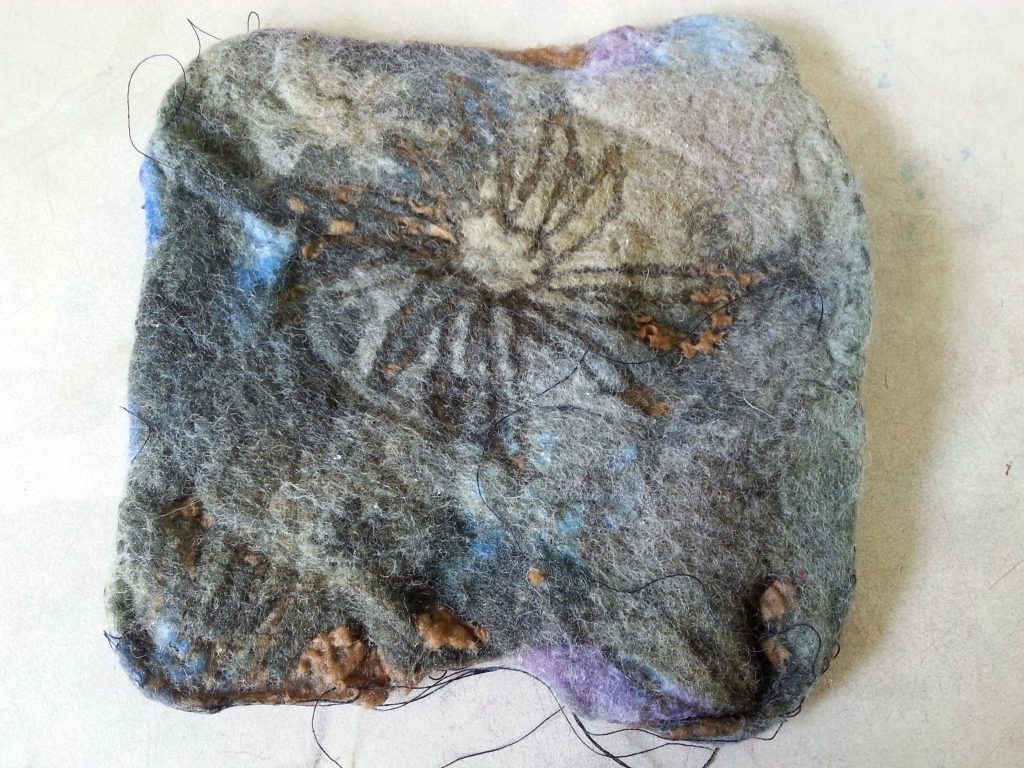
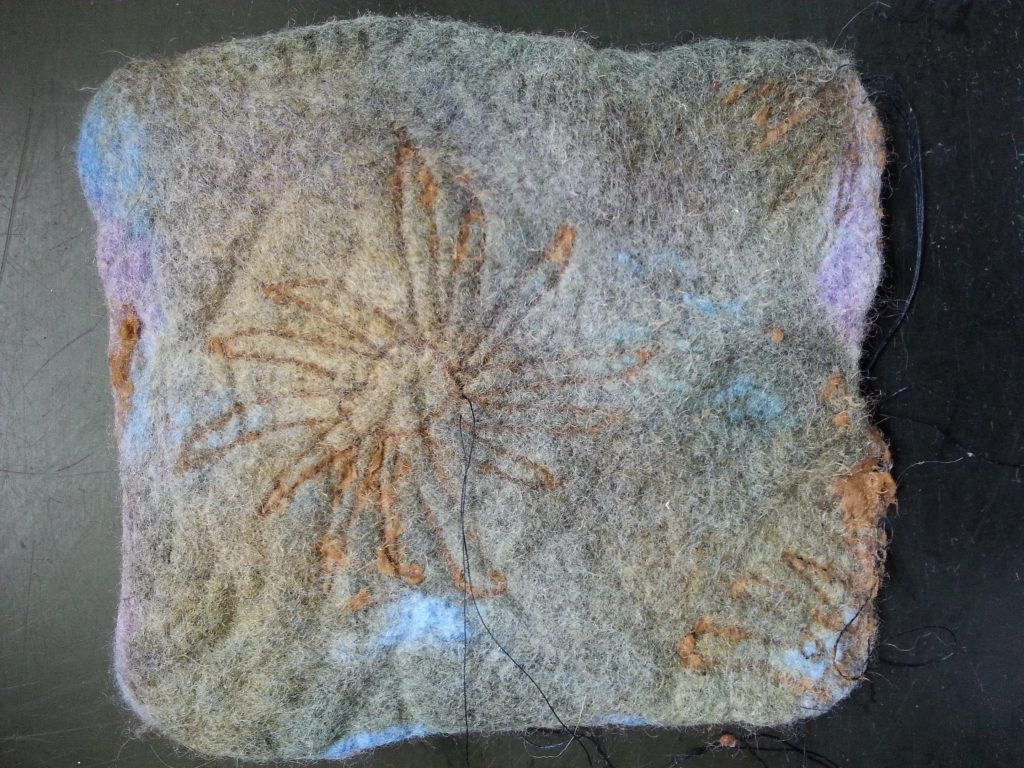
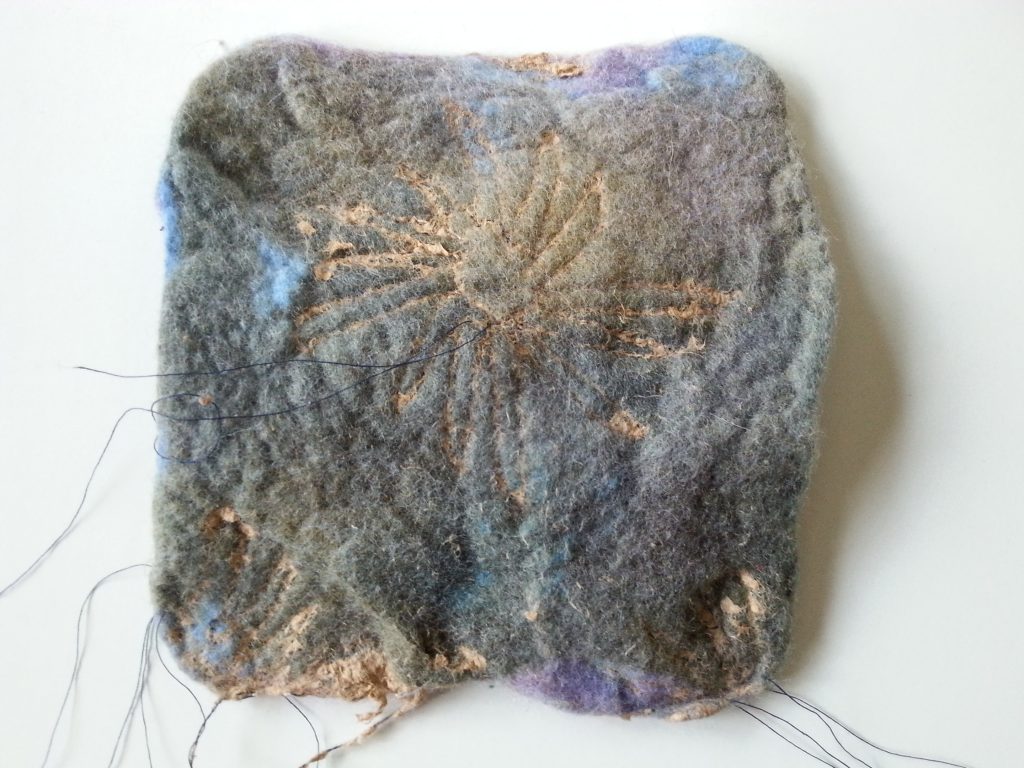
Felt – Colour Layering & Cutting – Sample 1 – Cut Flat-felt
-
- MMT Assignment 5 – Final Piece – Sampling – Felt
-
- MMT Assignment 5 – Final Piece – Sampling – Felt
-
- MMT Assignment 5 – Final Piece – Sampling – Felt
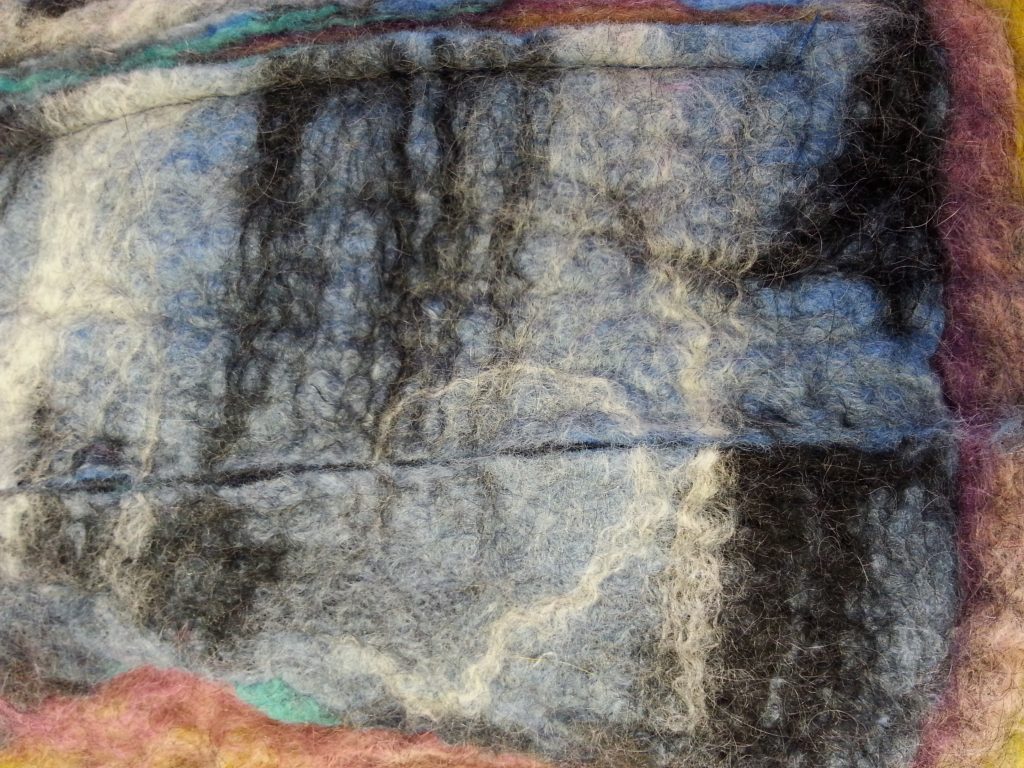
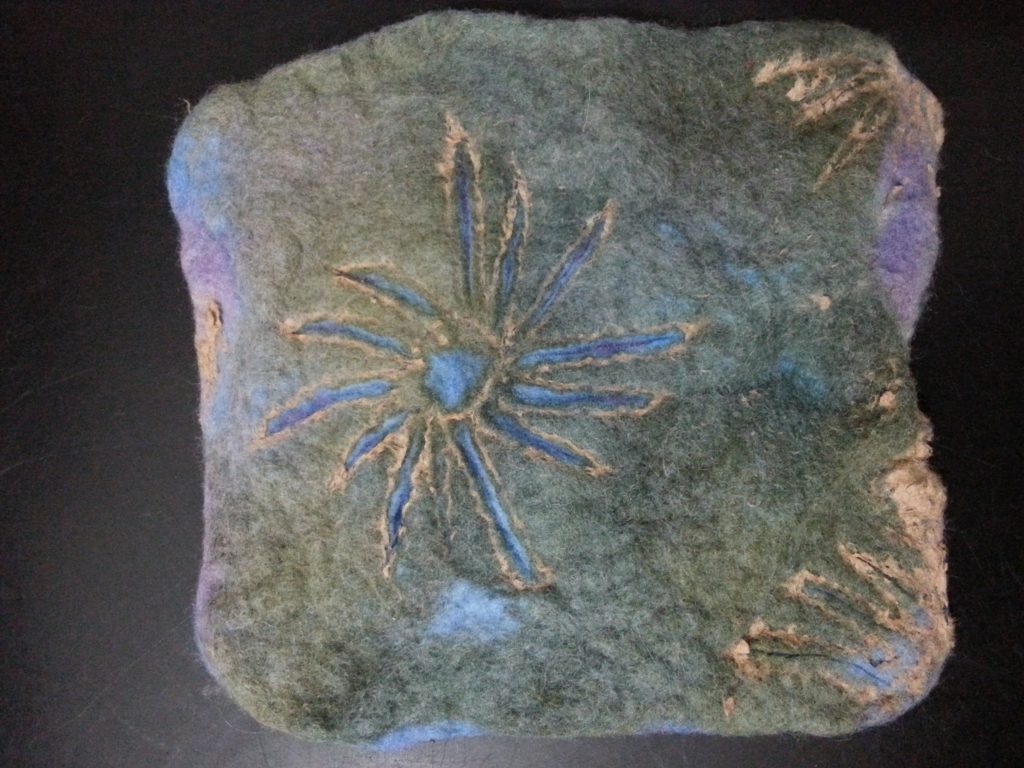
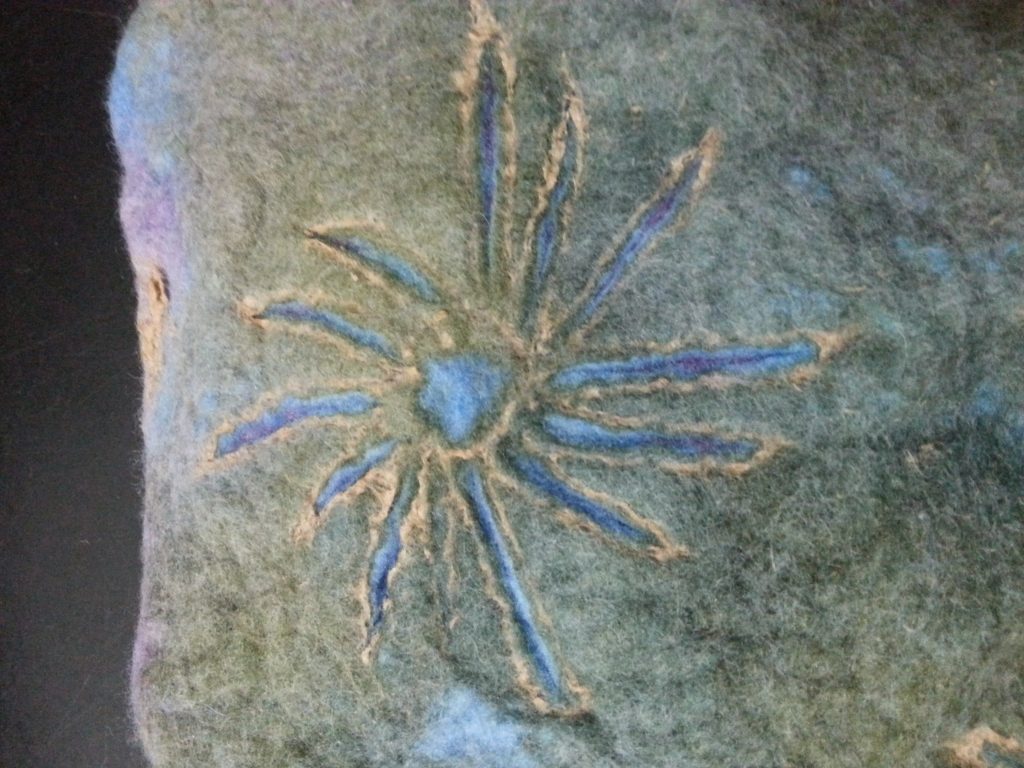
For this sample I wet felted layers of wool, choosing contrasting colours to better see the effect of the layers at the cutting stage. I machine-stitched two close, parallel tram lines and used sharp scissors to cut in between, exposing the inner layers. I left the edges with the layers visible to see how far I had cut into the fibre.
-
- MMT Assignment 5 – Final Piece – Sampling – Felt
-
- MMT Assignment 5 – Final Piece – Sampling – Felt
-
- MMT Assignment 5 – Final Piece – Sampling – Felt
-
- MMT Assignment 5 – Final Piece – Sampling – Felt
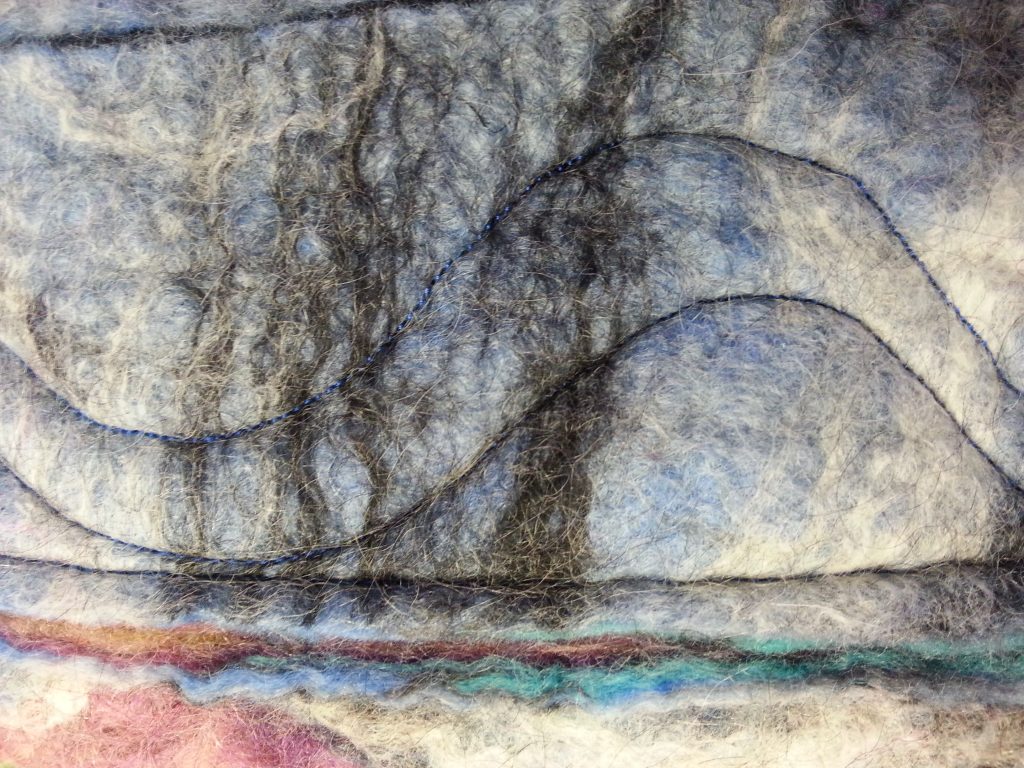
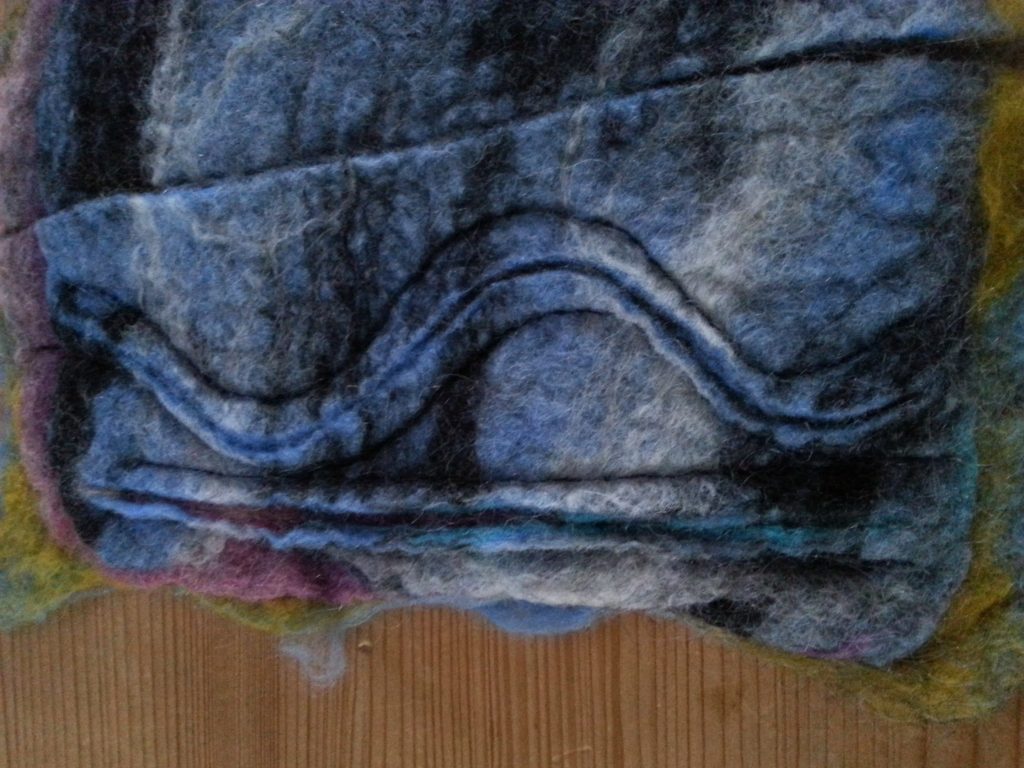
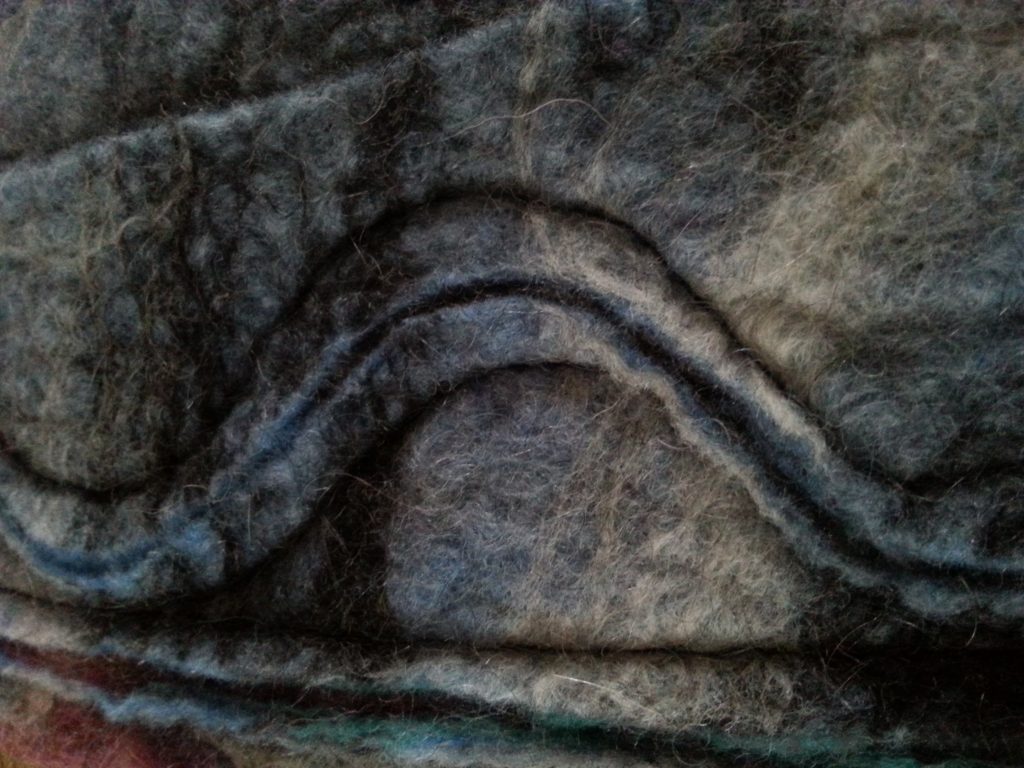
I went on to try two stitched curved lines, varying the distance between them to see how this impacted the outcome. I cut the lines as previously.
-
- MMT Assignment 5 – Final Piece – Sampling – Felt
-
- MMT Assignment 5 – Final Piece – Sampling – Felt
-
- MMT Assignment 5 – Final Piece – Sampling – Felt
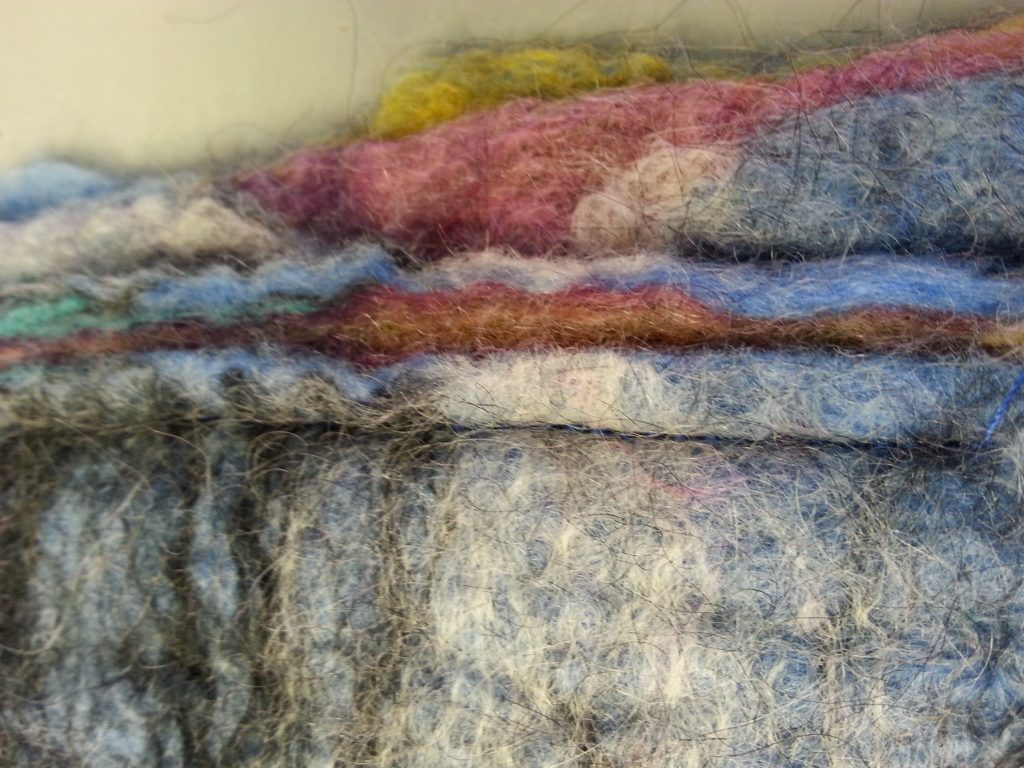
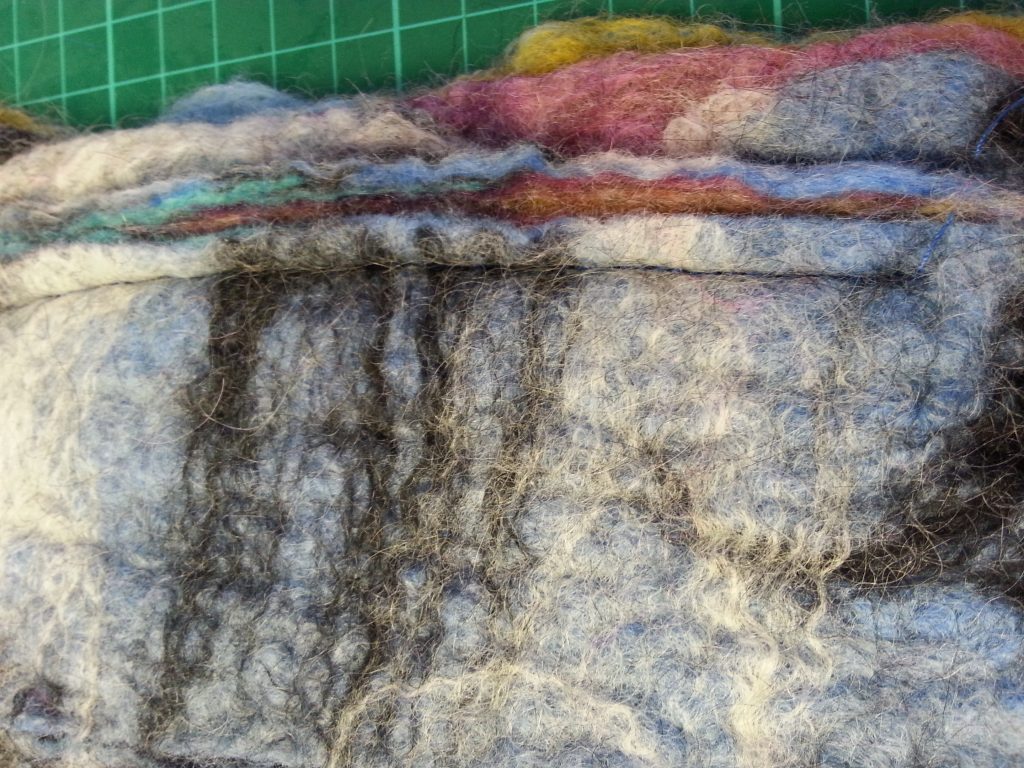
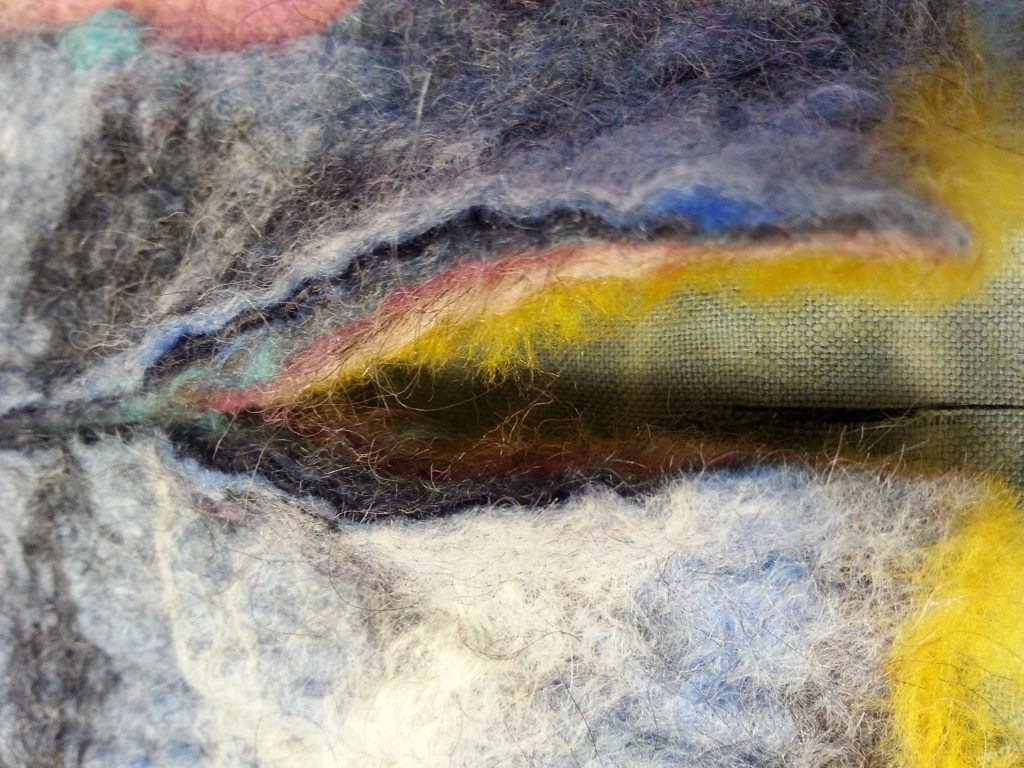
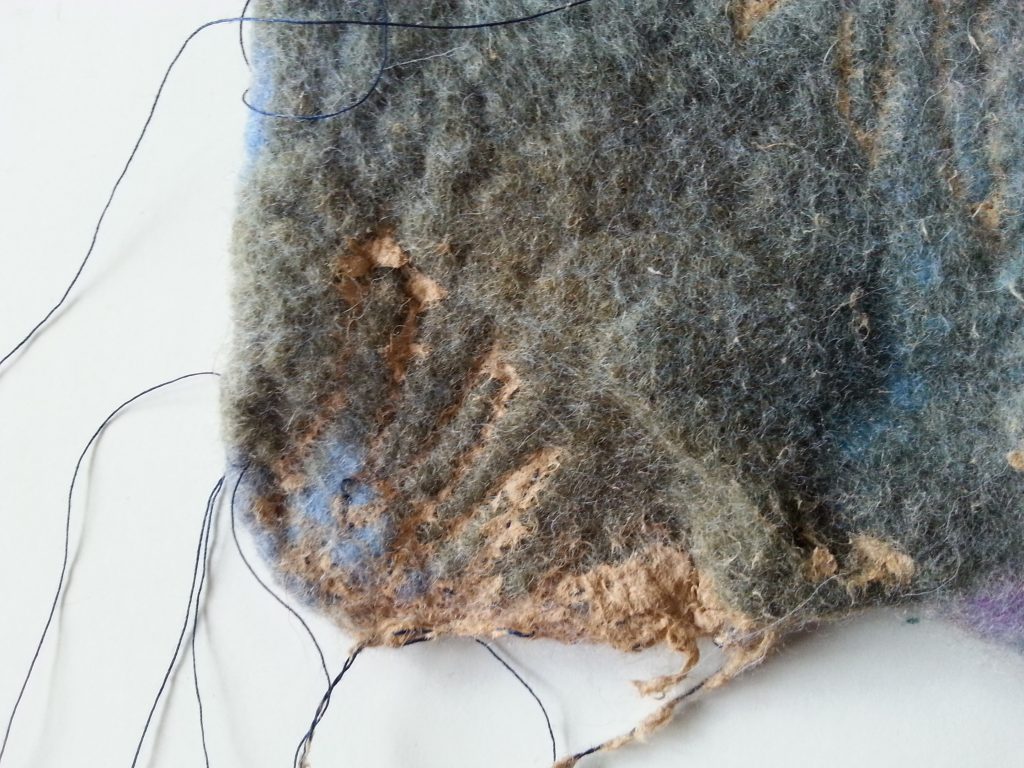
When making the felt fabric I had embedded a strip of non-feltable cotton to see what the impact would be of the cotton in revealing the layers. I cut down to the cotton layer and removed it to expose the under layers of felt.
Outcome and Thoughts
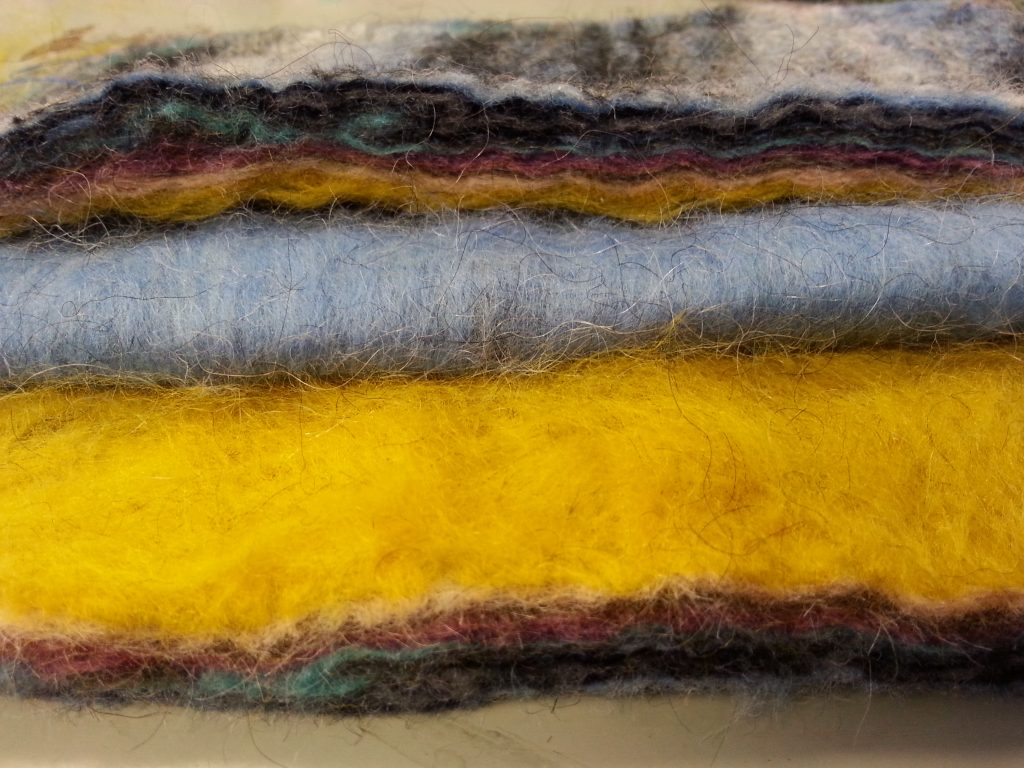
The stitching lines on the straight and curved samples are about the right distance apart to show the lower layers. Bending the fabric enhances the visibility of the layers. To soften the look I used a toothbrush to create fuzzier edges and give a more naturally hewn, aged appearance to look like an ancient carving. The curves worked well both where they were closer together and further apart.
The embedded cotton was too low down in the felt. This meant that although the reveal of the layers was clearer than in the other samples, the felt hadn’t adhered across the entire width of the strip. The sample therefore had a much bigger section that came apart when cut.
I see potential in this sample. The colours were not important here but the top layer with its subtle variations in colour is particularly successful. Cutting needs to be careful – I started with a craft knife but it was too easy to go through all the layers! Sharp scissors with fine points are much more effective. Embedding non-feltables is still an option but the strip must be accurately placed and marked. Care also needs to be taken to ensure it is in the right part of the felt layering. It is, however, potentially easier to control the layer exposure using a resist. This was a successful combination of techniques from sewing fabric with a different medium.
Felt – Colour Layering & Cutting – Sample 2 – Flat-felt
-
- Felt – Colour Layering & Cutting – Sample 2
-
- Felt – Colour Layering & Cutting – Sample 2
-
- Felt – Colour Layering & Cutting – Sample 2
-
- Felt – Colour Layering & Cutting – Sample 2
-
- Felt – Colour Layering & Cutting – Sample 2
-
- Felt – Colour Layering & Cutting – Sample 2
-

- Felt – Colour Layering & Cutting – Sample 2
-
- Felt – Colour Layering & Cutting – Sample 2
-
- Felt – Colour Layering & Cutting – Sample 2
-
- Felt – Colour Layering & Cutting – Sample 2
-
- Felt – Colour Layering & Cutting – Sample 2
-
- Felt – Colour Layering & Cutting – Sample 2
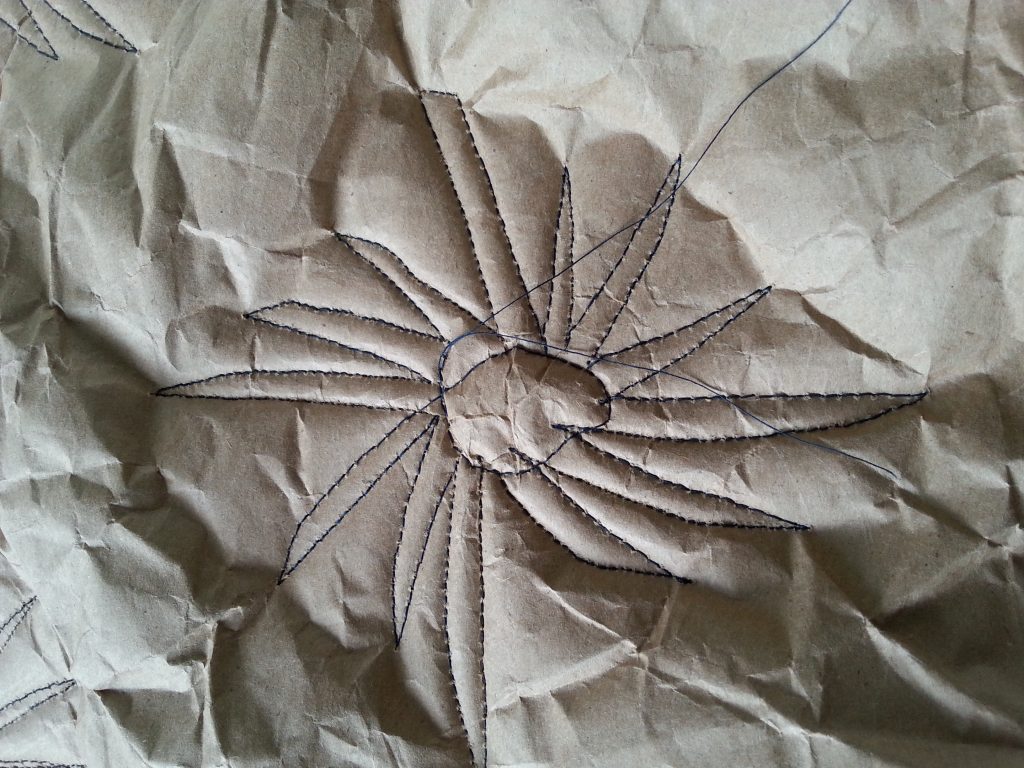
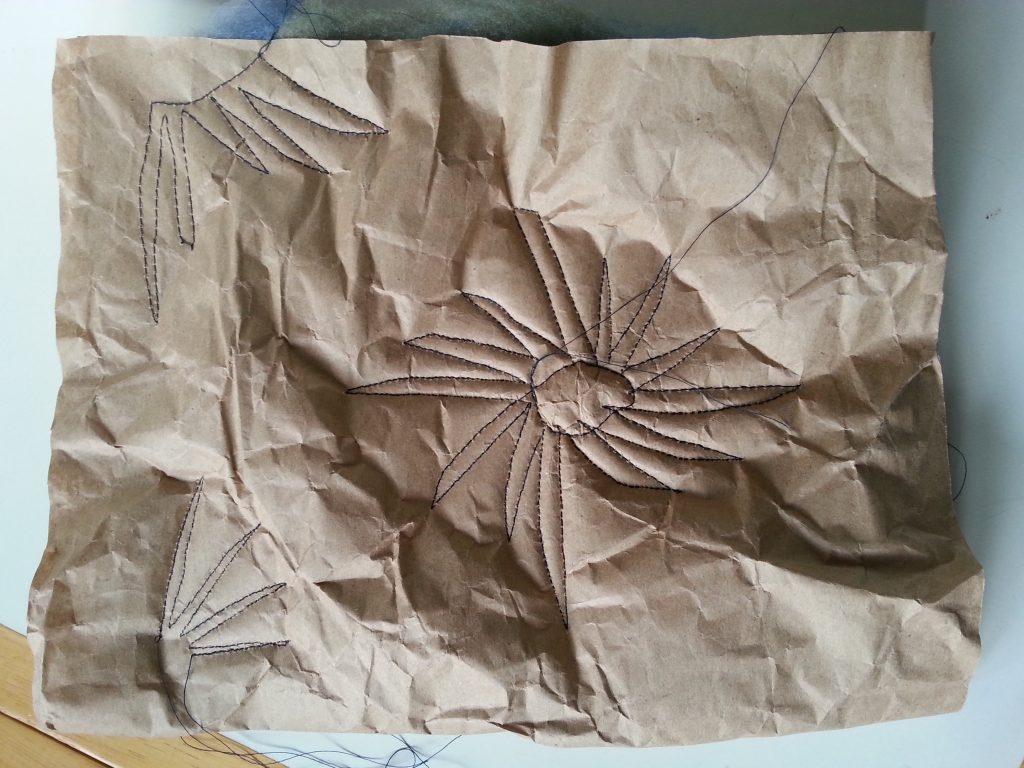
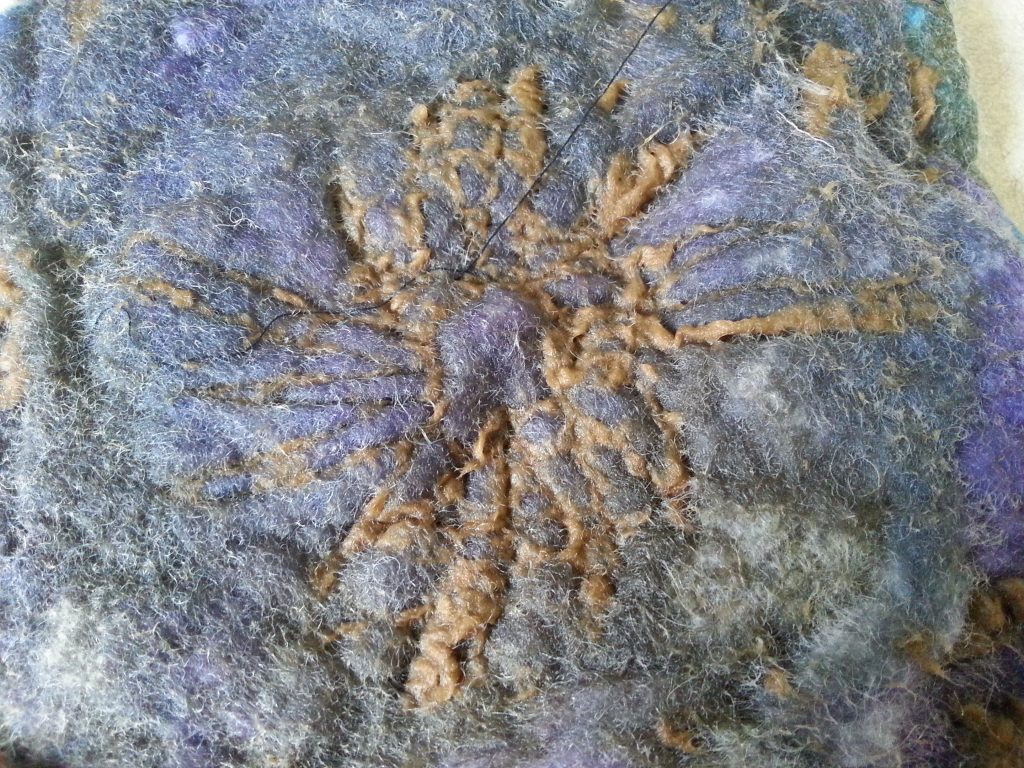
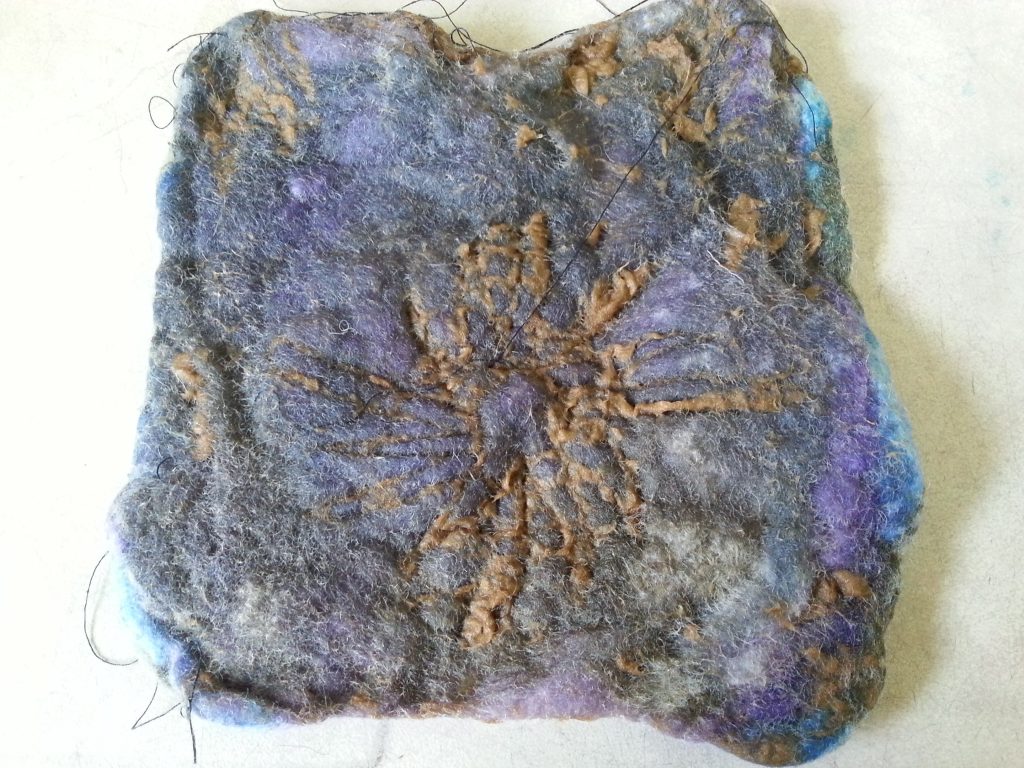
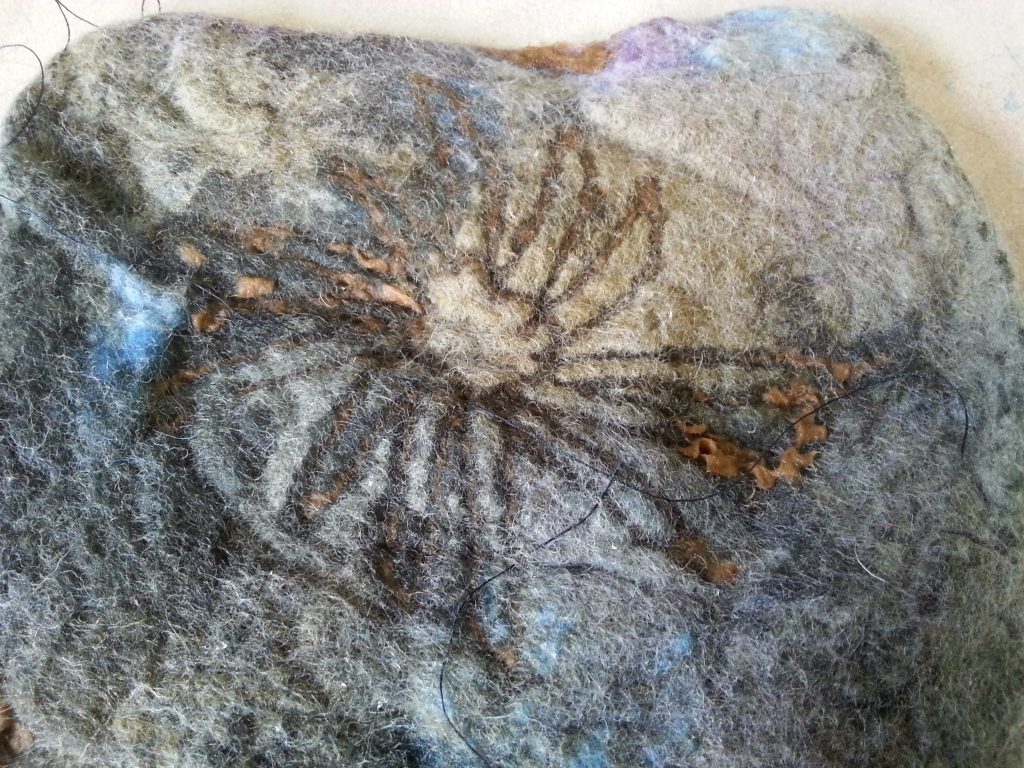
In sample 1 I freehand stitched the lines. This would be limited if a more complex design was required. For this reason, for sample 2 I wanted to explore ways to mark the felt for stitching before cutting, still with the aim of developing the slashing and cutting ‘chenille’ effect. A brief attempt to mark the felt with a marker pen proved unsuccessful so I used a technique that is used in sewing. I sketched a simple design on brown paper, trapped the batt of unfelted fibre between two layers of brown paper and stitched over it with the machine. I then felted the batt in the washing machine as it would have been difficult to remove the paper without disturbing the felt batt. After felting, I used sharp scissors to cut the sections between the stitched lines as for sample 1.
Outcome & Thoughts
Filing this one under ‘learning exercise’! Not felting the batt before stitching was a mistake as the paper effectively felted into the batt. The paper also disintegrated in the washing machine, leaving a goopy mess. It was also impossible to remove the paper completely. On the plus side, the design did work within reason and the batt did felt. However, it felted very tightly and it required a lot of stretching to pull out the design. For future, pre-felting the batt, stitching (perhaps into a dissolvable medium) then removing the paper/medium before washing would seem to be an answer to most of the issues.
Interestingly, the paper did create an interesting additional layer of colour that was quite attractive, albeit that I think it will drop out over time.
Felt – Dyeing and Felting Using a Form – Sample 3 – Felted Vessel
-
- Felt – Colour Layering & Cutting – Sample 3
-
- Felt – Colour Layering & Cutting – Sample 3
-
- Felt – Colour Layering & Cutting – Sample 3
-

- Felt – Colour Layering & Cutting – Sample 3
-

- Felt – Colour Layering & Cutting – Sample 3
-
- Felt – Colour Layering & Cutting – Sample 3
-

- Felt – Colour Layering & Cutting – Sample 3
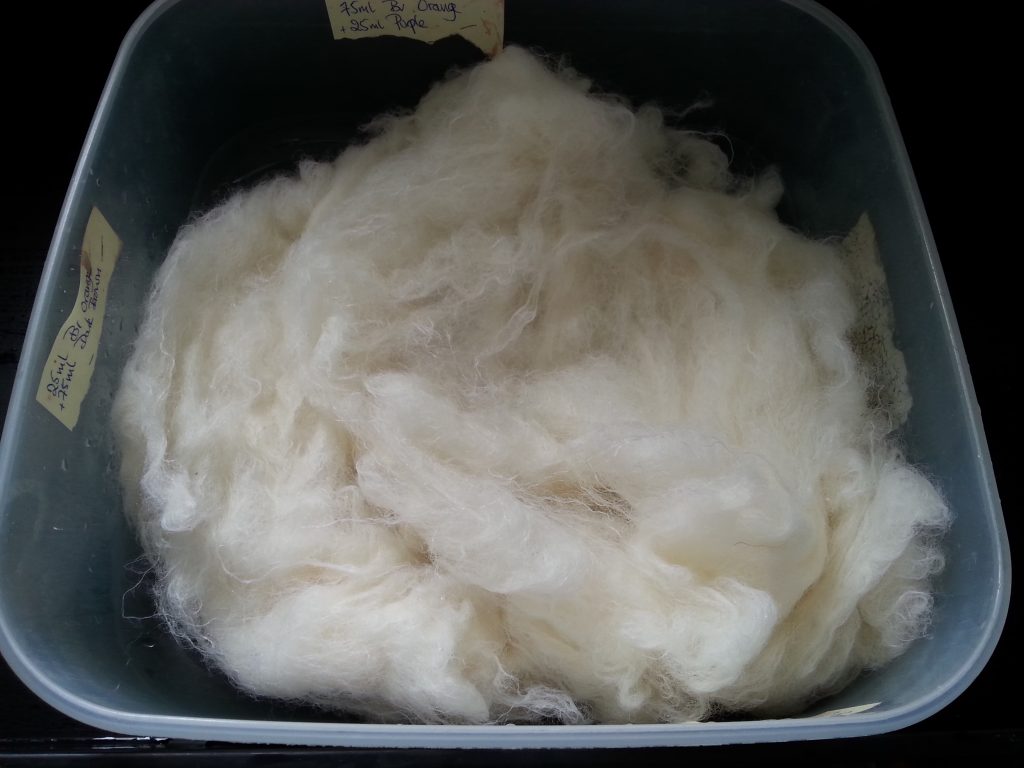
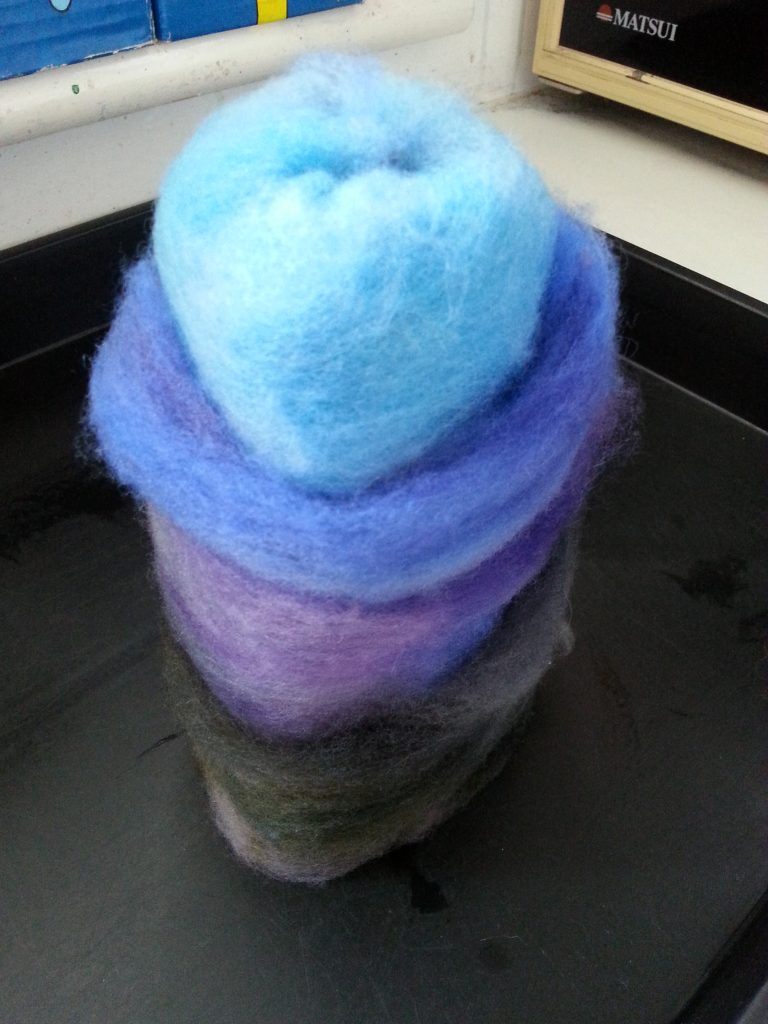
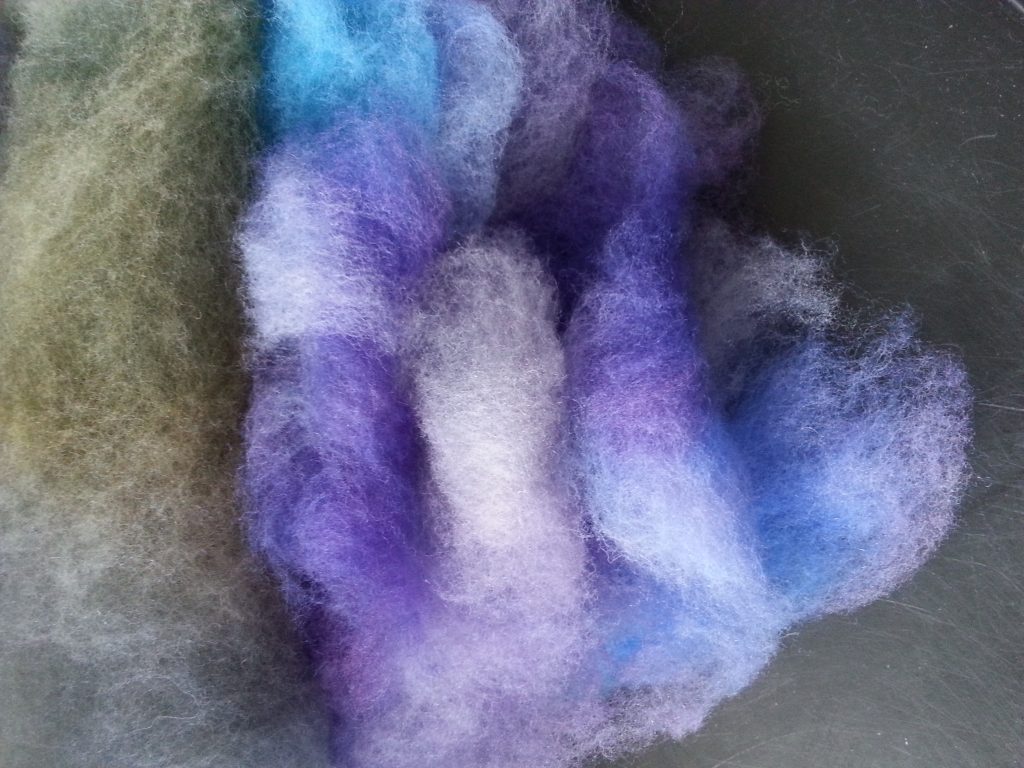
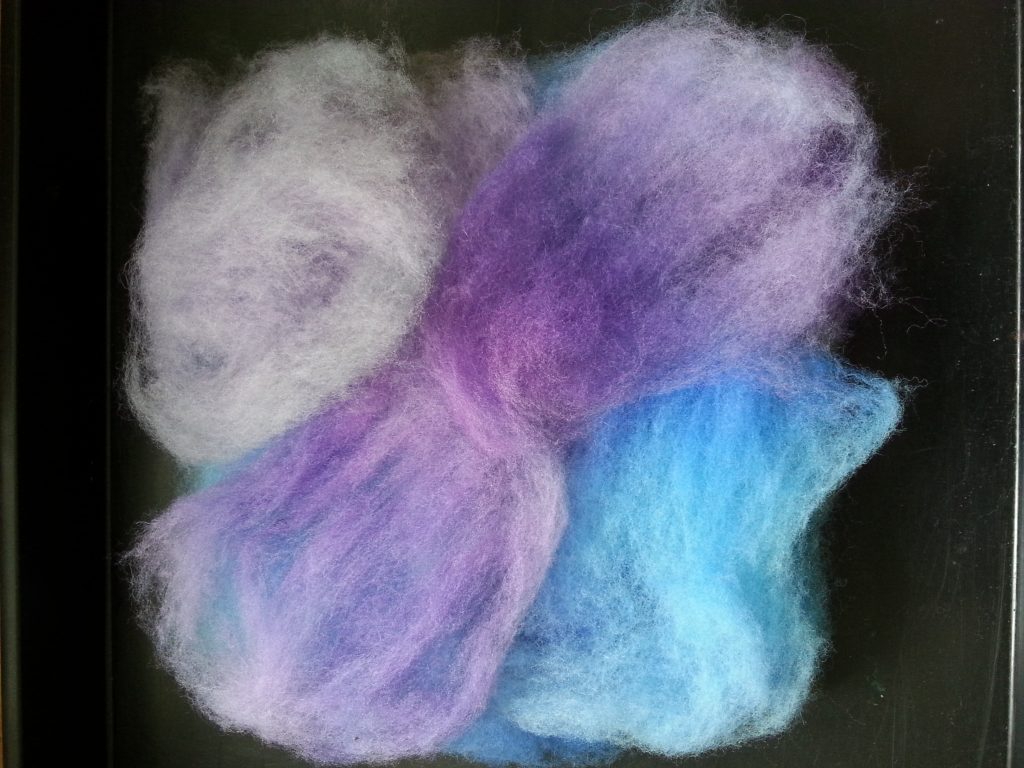
Sample 3 uses a felt batt (a commercially processed carded wool ‘sheet’) and a form to create a vessel. I hand-dyed the batt in long sections of colour using procion mx fibre reactive dyes and an acid dye method. I then stripped a length around 12cm wide down the long edge of the batt.
To explore a different theme, I chose a linear motif, the idea being to interpret the underside ‘gills’ of fungi or ripples on the shore with a combination of wet and needlefelt in a vessel form, in part inspired by the ‘flanges’ of Copier’s architectural pieces.
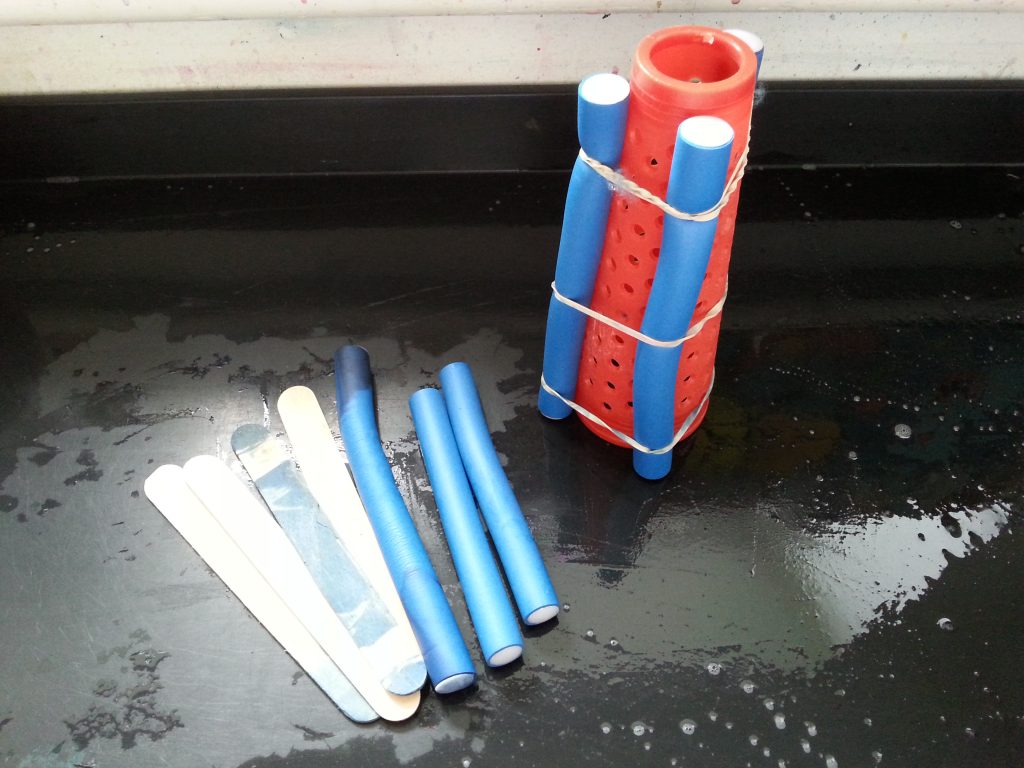
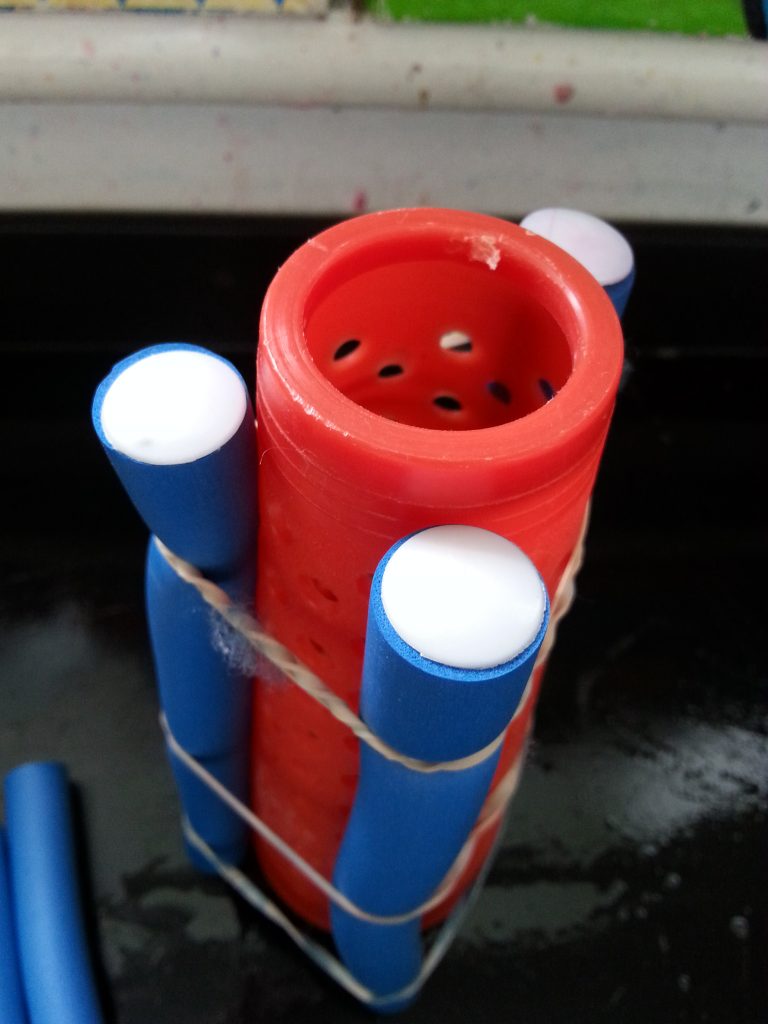
The dyed wool strip was wrapped around a knitting yarn cone. Sponge hair rollers were attached to the cone with elastic bands. The purpose of this was to create ridges in the finished vessel.
I wrapped the strip of batting around the cone and secured it in place with a length of nylon stocking. This was then wash-felted in the washing machine.
-

- Felt – Colour Layering & Cutting – Sample 3
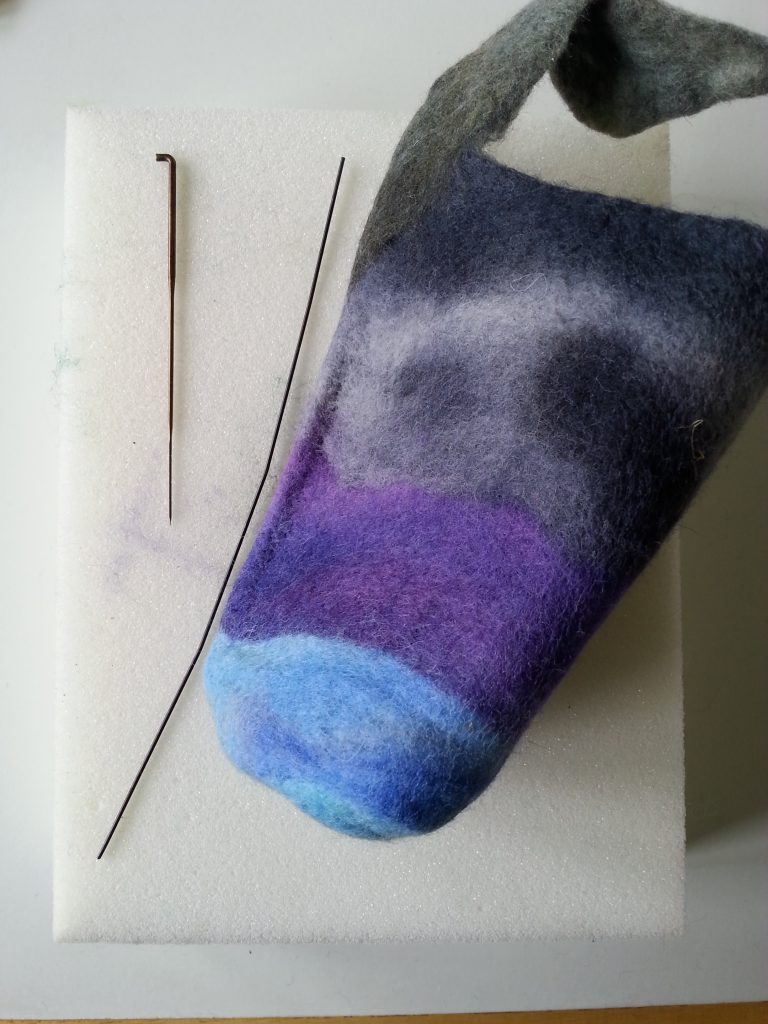
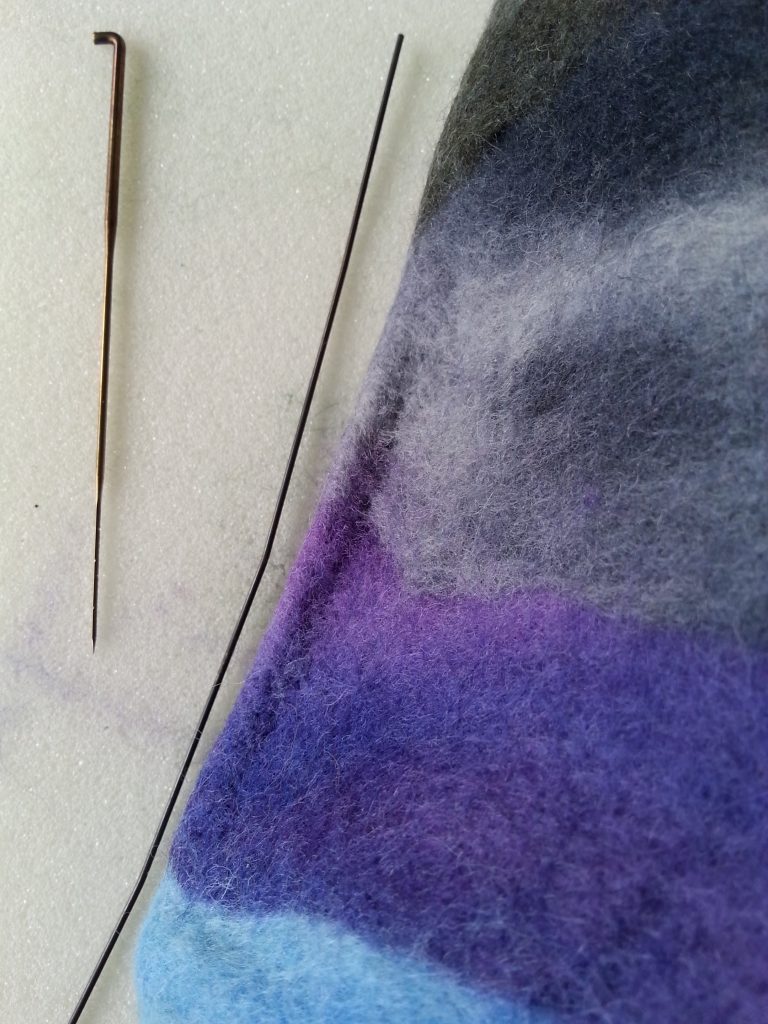
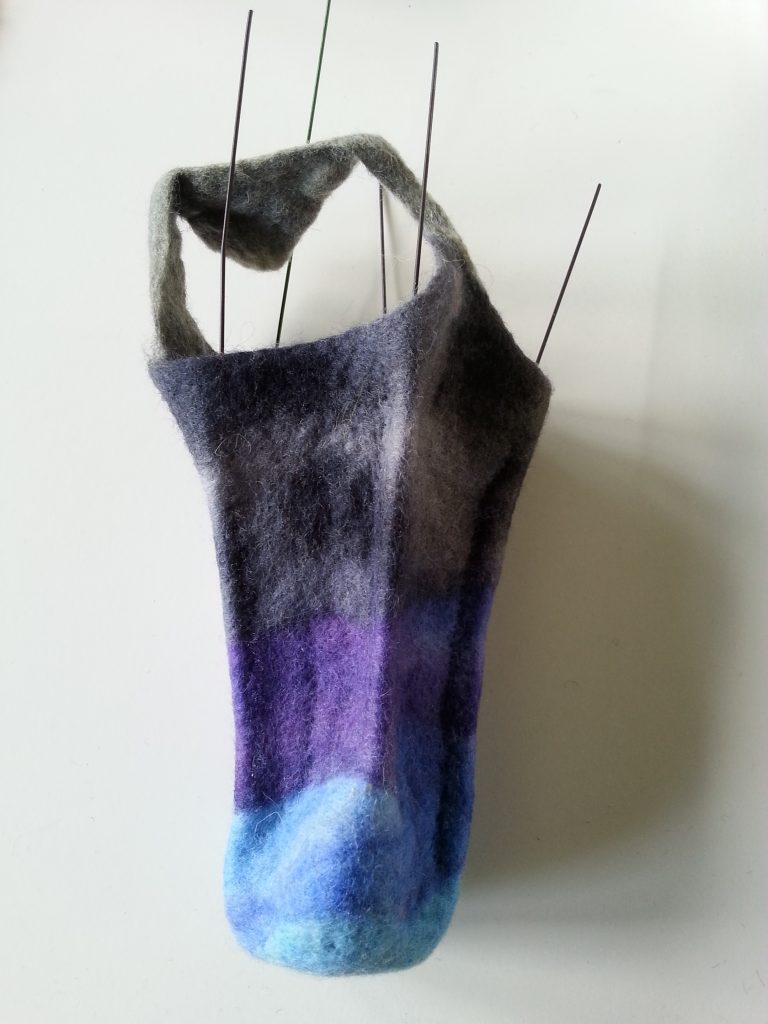
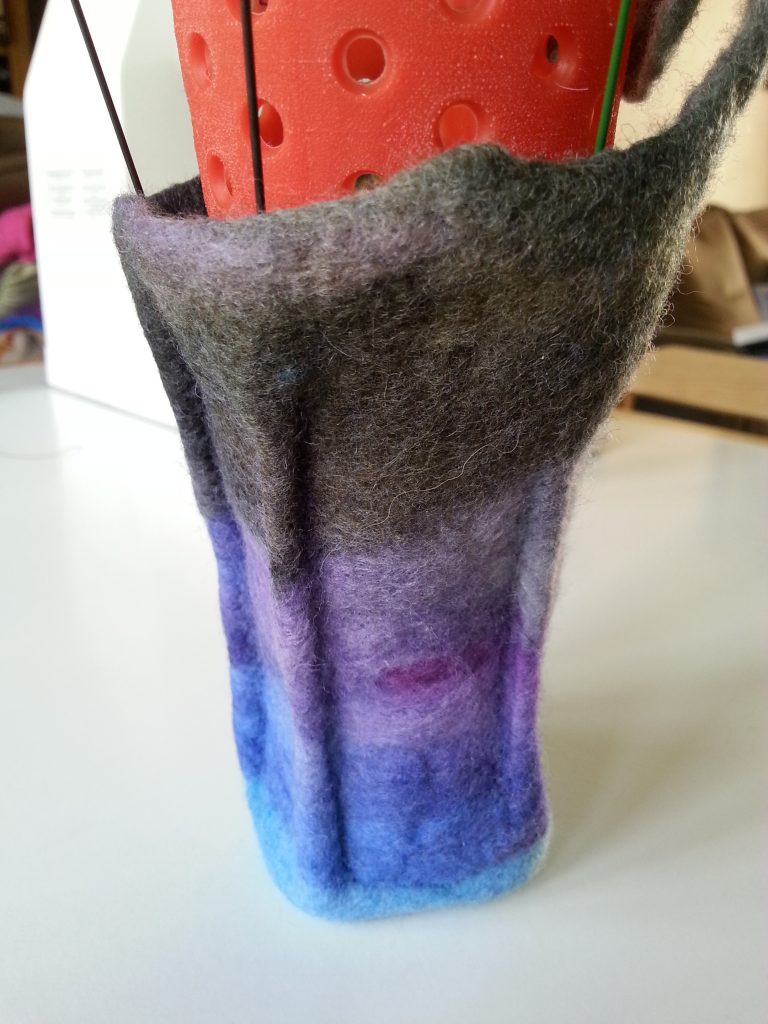

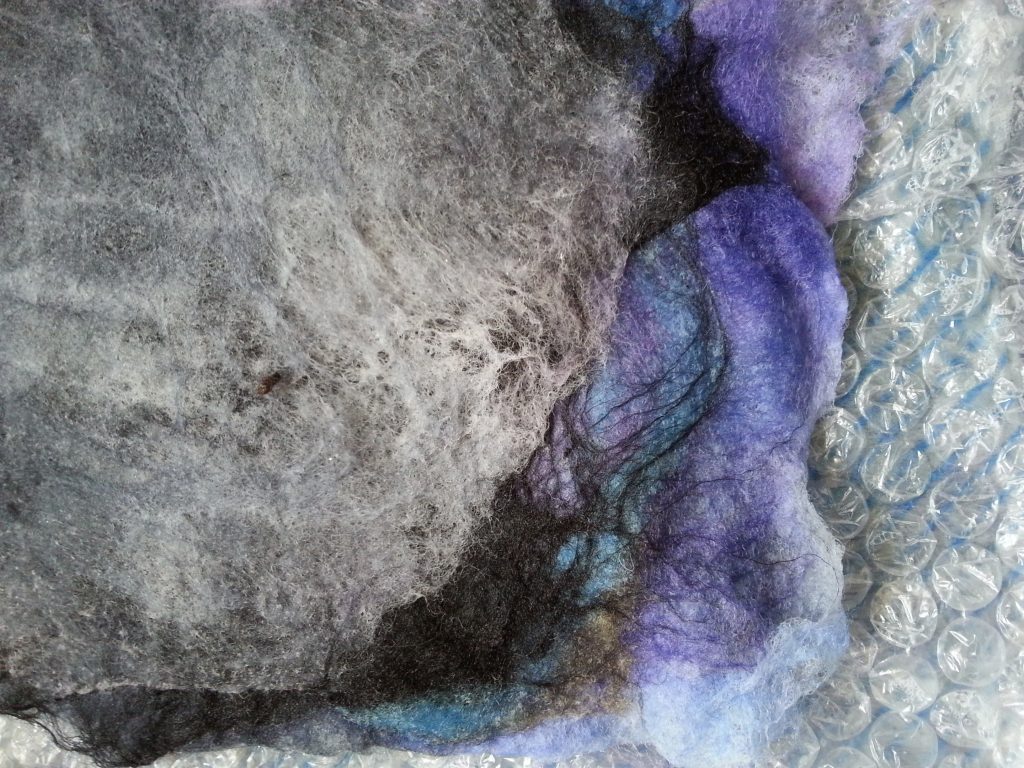
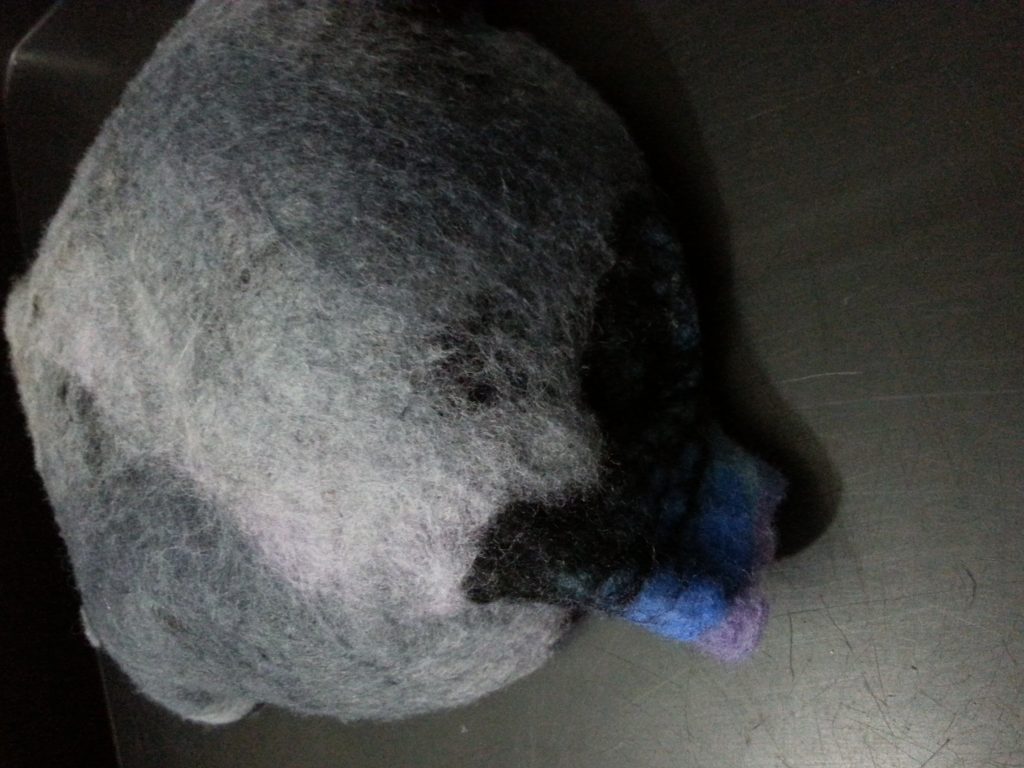
After machine-felting the rollers were removed but the felt left on the cone. A length of florist’s wire was inserted where the rollers were removed. The fabric was pinched and needlefelted around the wire to create the ‘gills’. Once firmly needlefelted in place the form was removed, the wires shortened and folded into place to secure them and the base stitched closed.
Outcome & Thoughts
Hand-dyeing the batt was much more successful than I anticipated and gave an excellent base for the eventual felt. The form for the vessel wasn’t an ideal shape, being too tall and narrow to create enough ‘gills’ for the fungi but as a test sample it demonstrated the possibilities of this technique. The needlefelting and wire was a more successful way to create the ‘gill’s than I anticipated, however, the felt needs to be softer and thinner to create the truly delicate texture of the inspiration source. This would need to be balanced with the need for sturdiness for the vessel itself.
Felt – Dyeing and Felting Using a Form – Sample 4 – Felted Vessel
-
- Felt – Dyeing and Felting Using a Form – Sample 4 – Felted Vessel
-

- Felt – Dyeing and Felting Using a Form – Sample 4 – Felted Vessel
-
- Felt – Dyeing and Felting Using a Form – Sample 4 – Felted Vessel
-
- Felt – Dyeing and Felting Using a Form – Sample 4 – Felted Vessel
-
- Felt – Dyeing and Felting Using a Form – Sample 4 – Felted Vessel
-
- Felt – Dyeing and Felting Using a Form – Sample 4 – Felted Vessel
-
- Felt – Dyeing and Felting Using a Form – Sample 4 – Felted Vessel
-

- Felt – Dyeing and Felting Using a Form – Sample 4 – Felted Vessel
-
- Felt – Dyeing and Felting Using a Form – Sample 4 – Felted Vessel
-
- Felt – Dyeing and Felting Using a Form – Sample 4 – Felted Vessel
-
- Felt – Dyeing and Felting Using a Form – Sample 4 – Felted Vessel
-
- Felt – Dyeing and Felting Using a Form – Sample 4 – Felted Vessel
-
- Felt – Dyeing and Felting Using a Form – Sample 4 – Felted Vessel
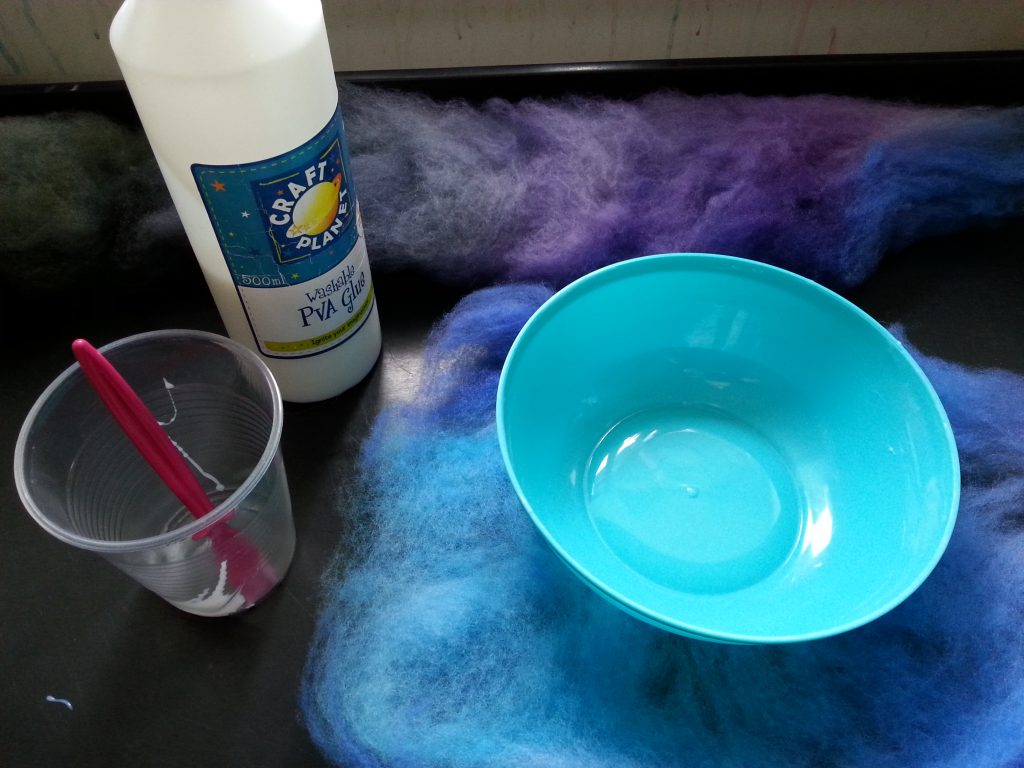
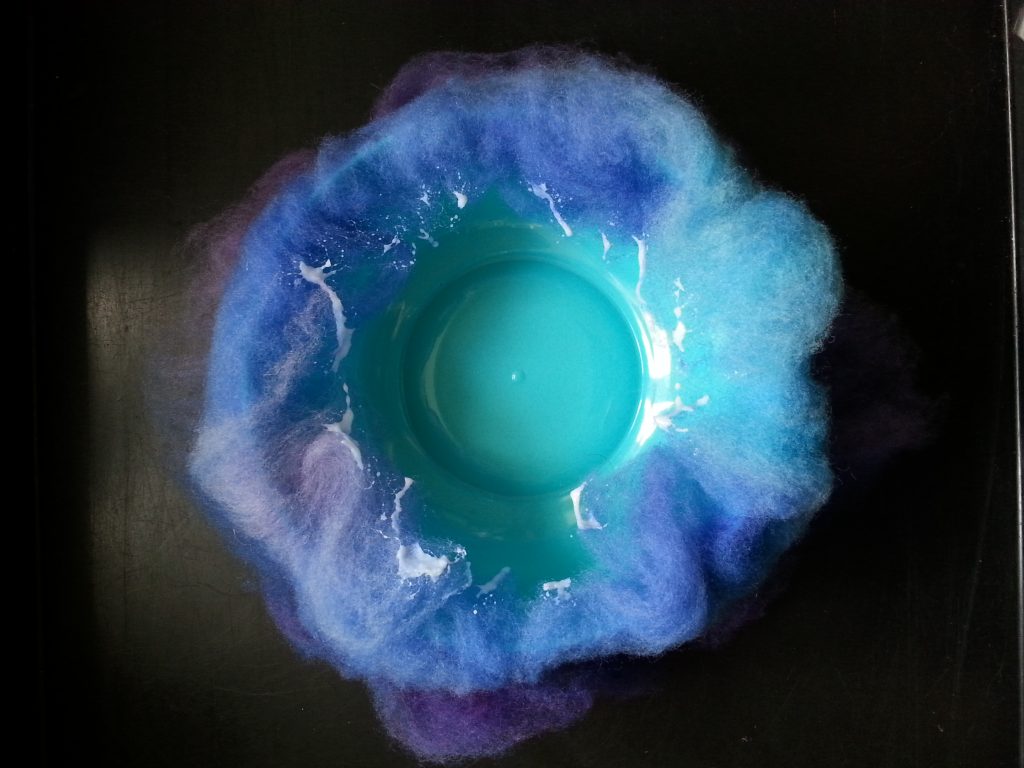
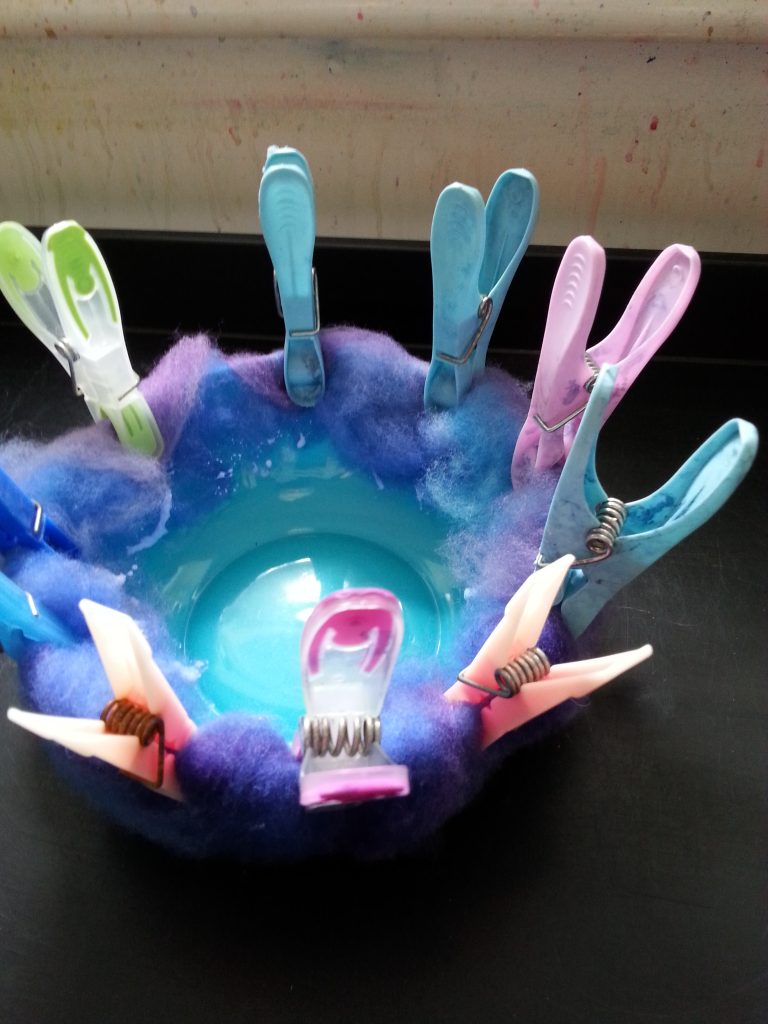
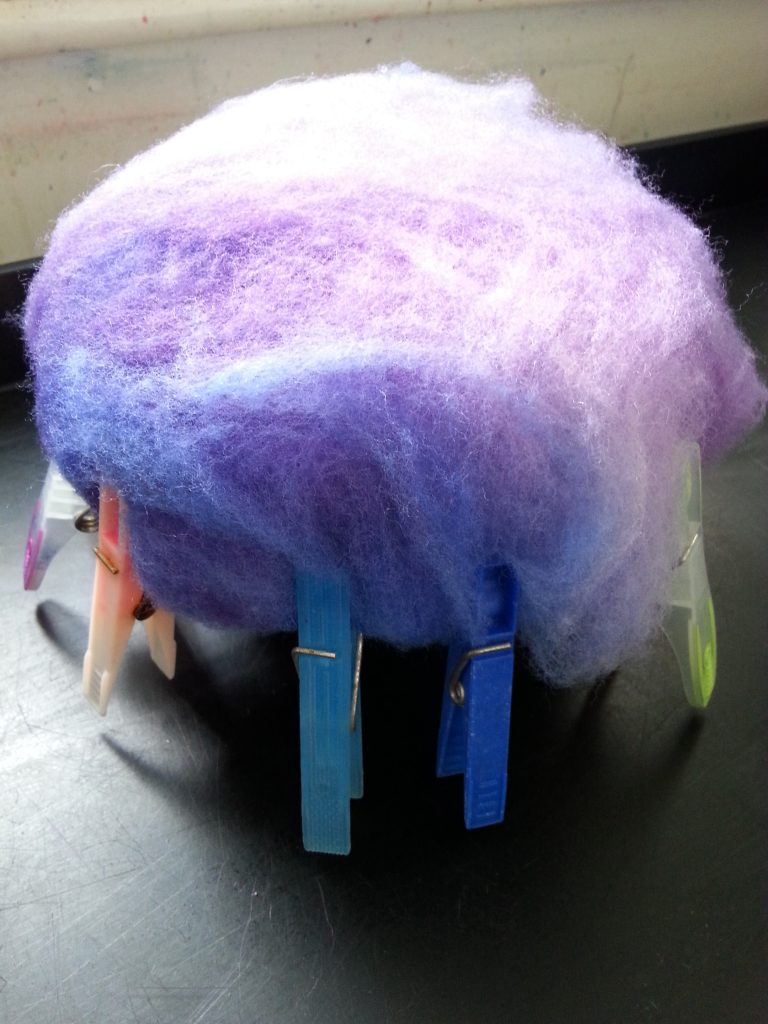
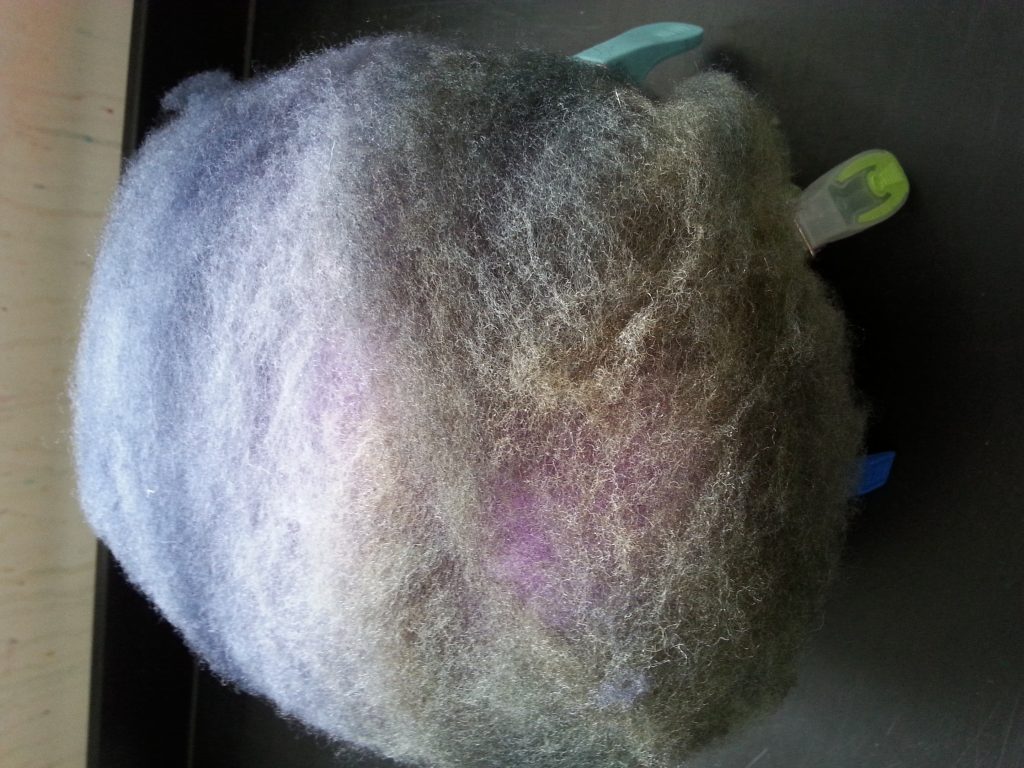
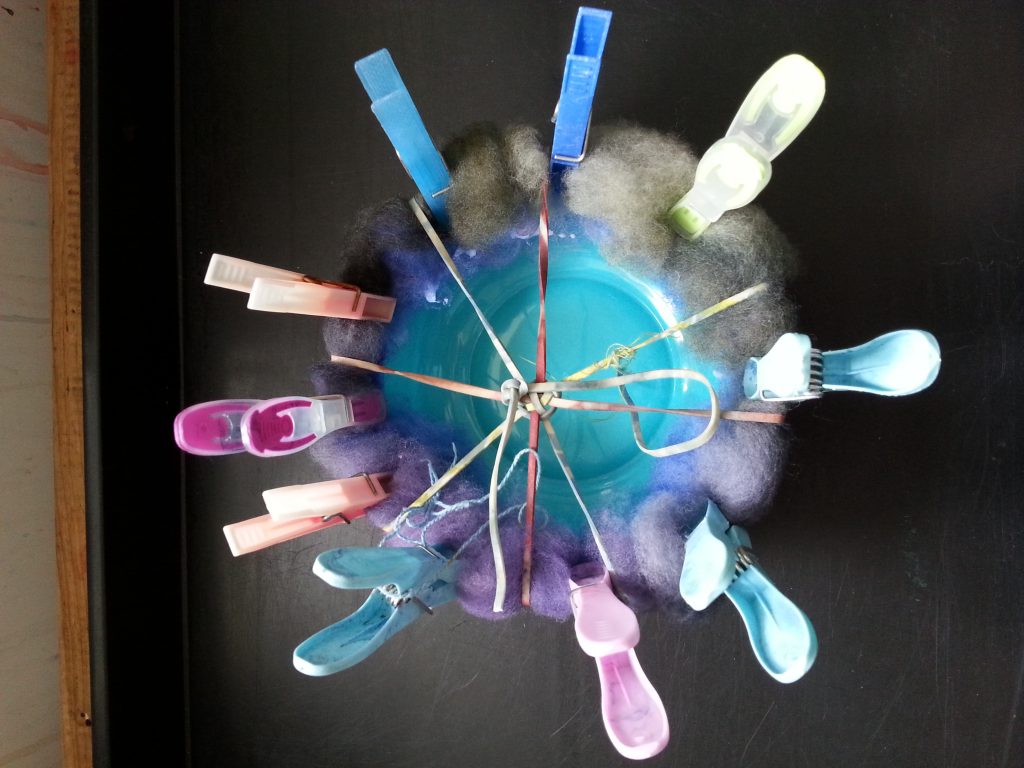
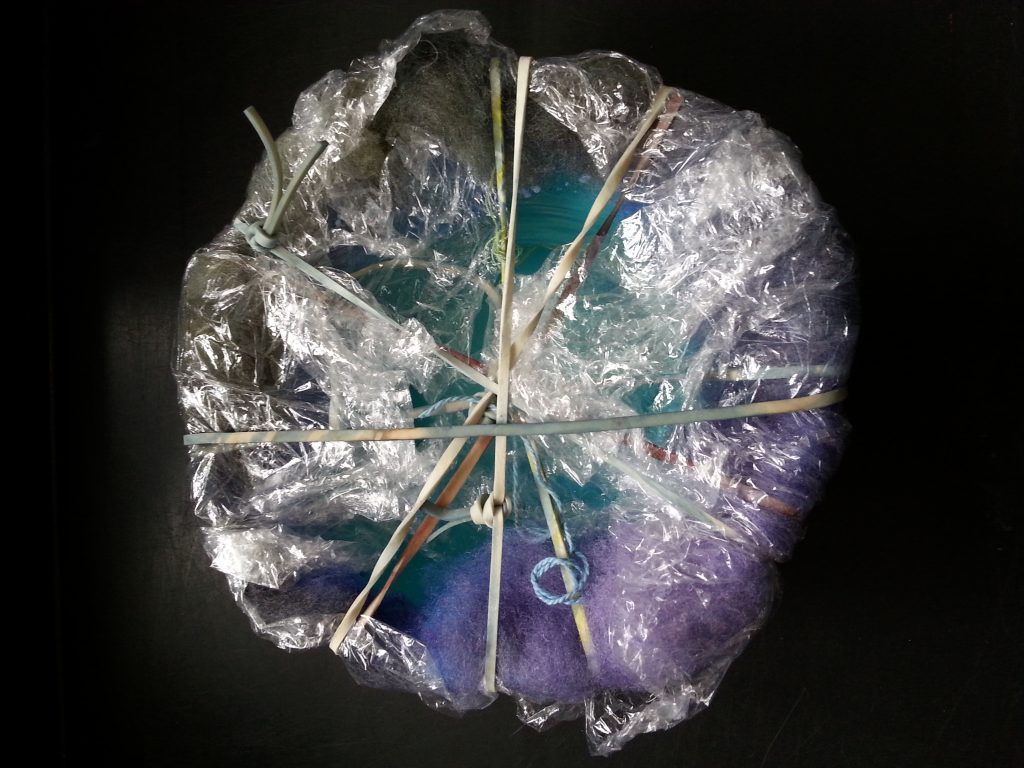
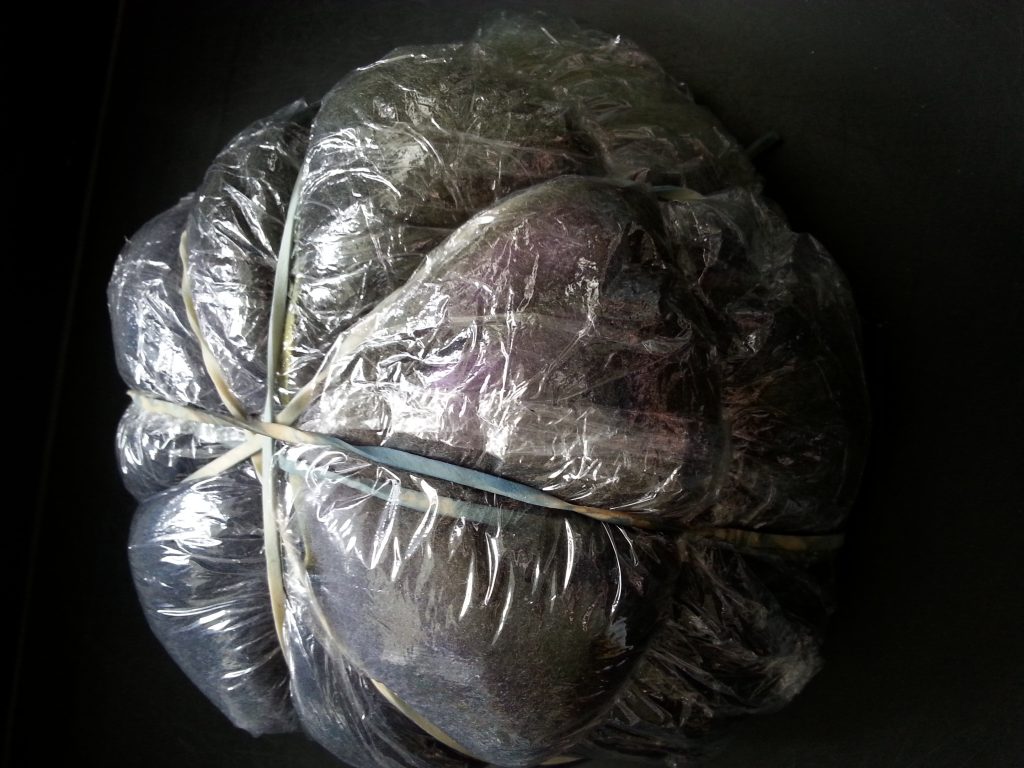
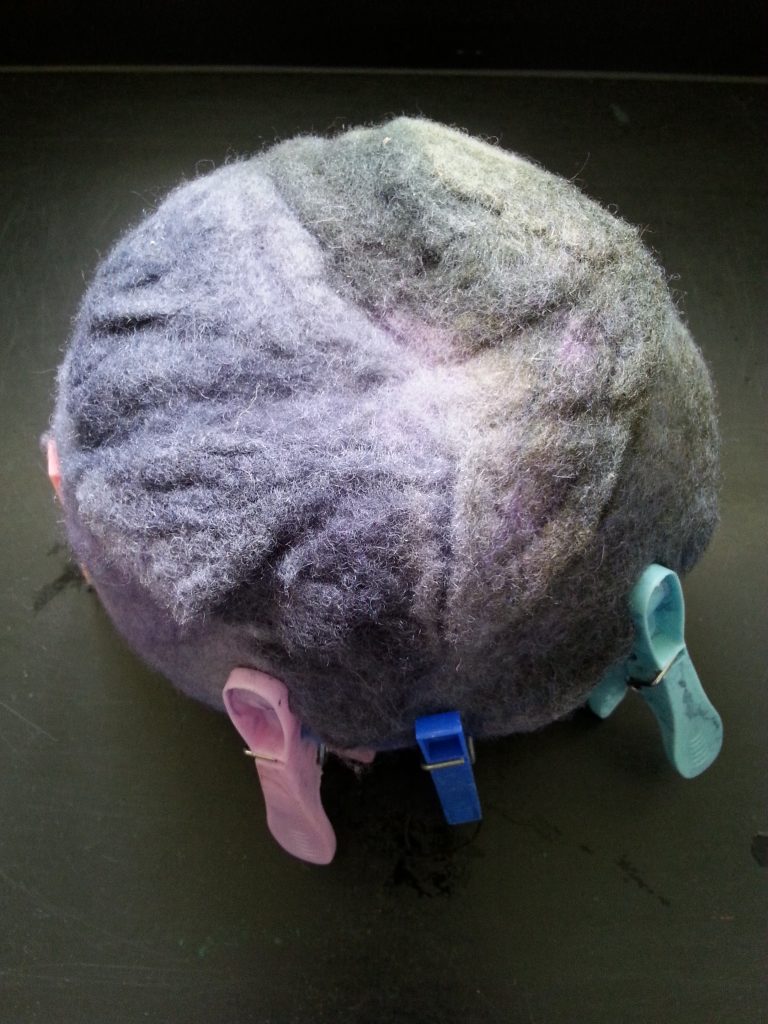
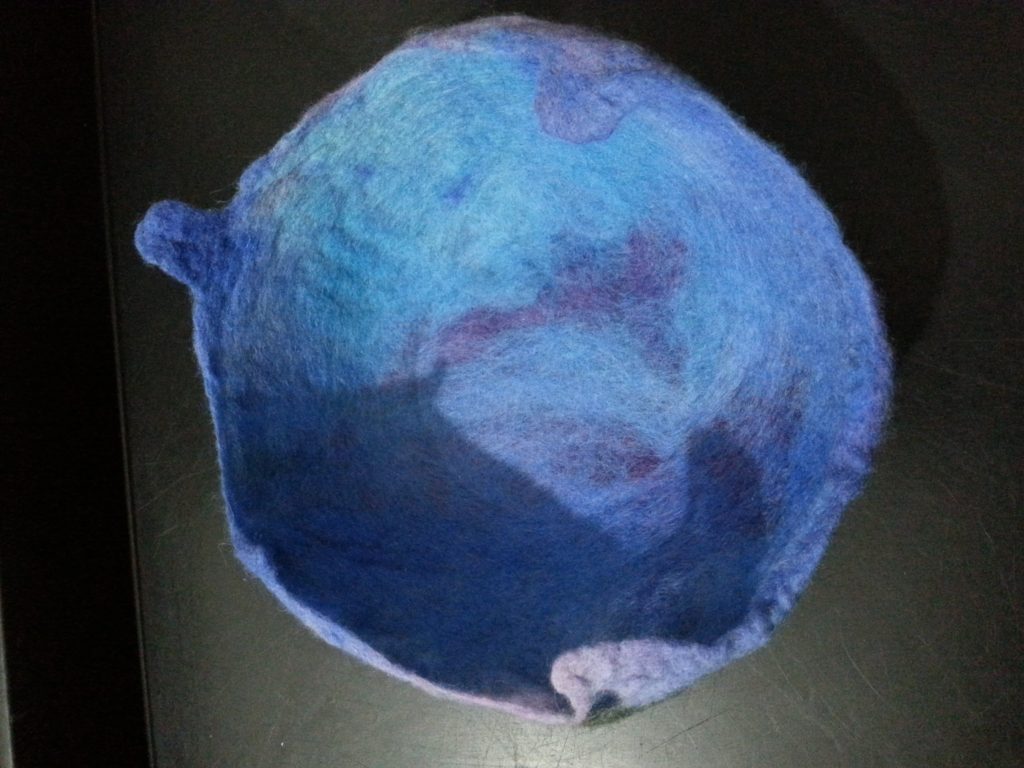
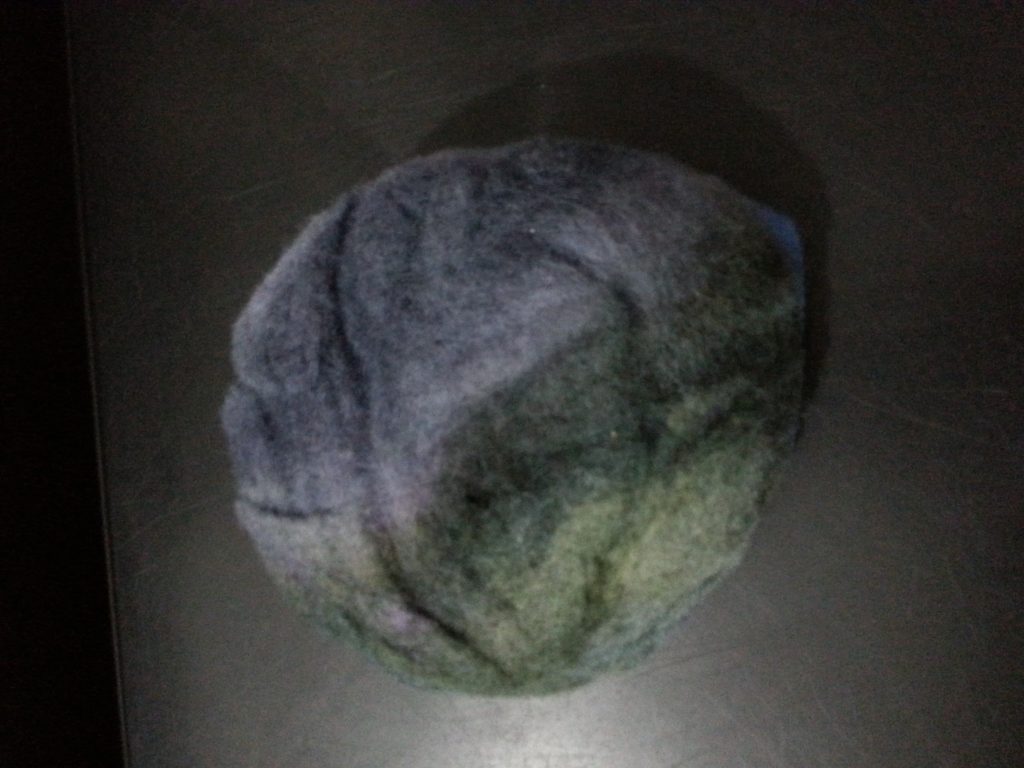
This sample used another strip of the hand-dyed batt but stripped into small sections and layered over a plastic bowl. Having made several layers the felt was lightly pasted to the bowl with pva around the rim (this should dissolve in the wash). The covered bowl was secured with clothespegs until dry then, after removing the pegs the covered bowl was encased in clingfilm. Elastic bands secured the clingfilm and the whole piece was washed in the machine to felt it.
Outcome & Thoughts
Despite what I thought was a secure process, the felt escaped from the film and felted into a solid wadge. The elastic bands became embedded into the felt. However, while the felt was still wet I carefully cut out the bands and smoothed over the felt. I was also able to stretch the damp felt back out over the bowl surprisingly well. What quickly became apparent that couldn’t be fixed was that unfortunately the felt was far too thin and didn’t hold the bowl shape even when dry. Leaving this one for now – may cut up and use elsewhere?
Felt – Dyeing and Felting Using a Form – Sample 5 – Cut-felt Vessel
-
- Felt – Dyeing and Felting Using a Form – Sample 5 – Felted Vessel
-
- Felt – Dyeing and Felting Using a Form – Sample 5 – Felted Vessel
-
- Felt – Dyeing and Felting Using a Form – Sample 5 – Felted Vessel
-
- Felt – Dyeing and Felting Using a Form – Sample 5 – Felted Vessel
-
- Felt – Dyeing and Felting Using a Form – Sample 5 – Felted Vessel
-

- Felt – Dyeing and Felting Using a Form – Sample 5 – Felted Vessel
-
- Felt – Dyeing and Felting Using a Form – Sample 5 – Felted Vessel
-
- Felt – Dyeing and Felting Using a Form – Sample 5 – Felted Vessel
-
- Felt – Dyeing and Felting Using a Form – Sample 5 – Felted Vessel
-
- Felt – Dyeing and Felting Using a Form – Sample 5 – Felted Vessel
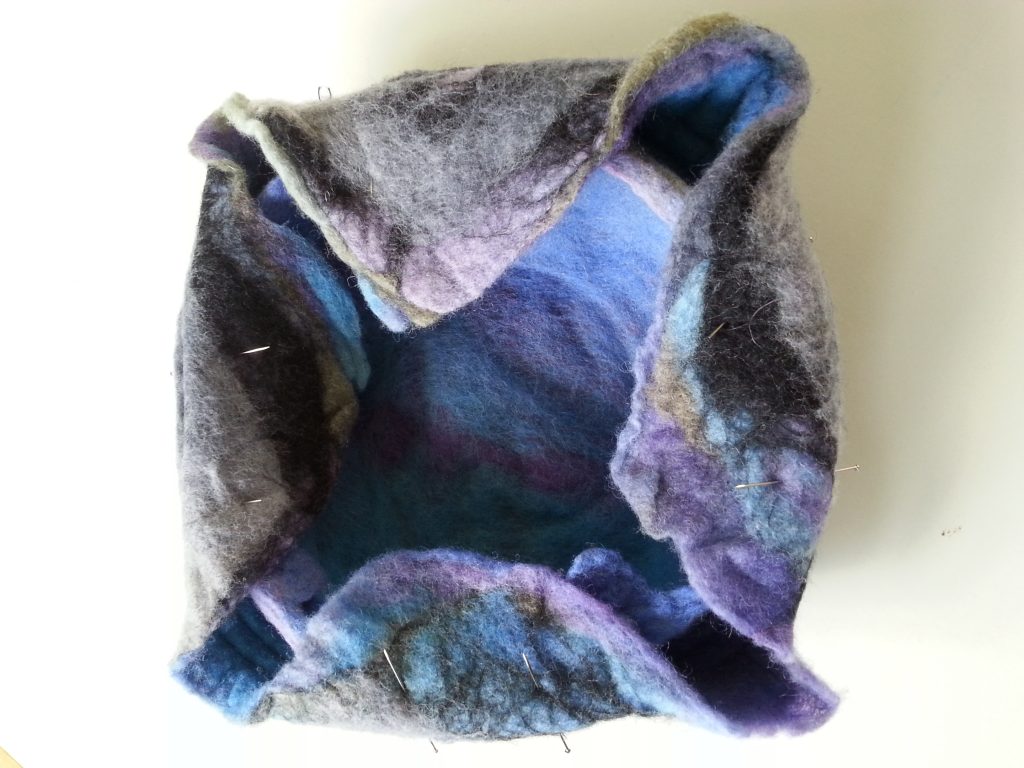
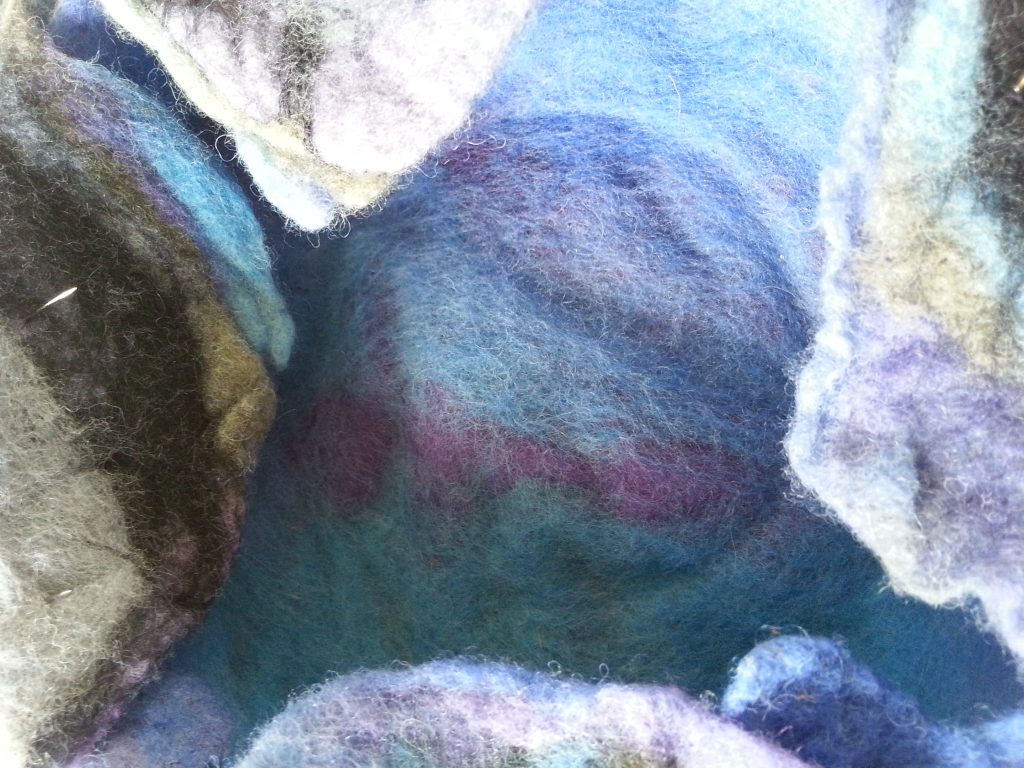
Stage one of this vessel was to create a thick layer of wet-felt, layered to place not only different colours in the separate layers but also to place different colours within the layers. My hope with this was to create additional colour, light and shade where the cut layers are revealed. Once the hand-dyed felt batt had been hand-felted as a flat piece, it seemed likely that it would fit around the bowl with the earlier, thin sample inside as a ‘lining’ piece. I tried a rough working of this, pinching to form corners. At this stage the bowl wasn’t looking too impressive.
-
- Felt – Dyeing and Felting Using a Form – Sample 5 – Felted Vessel
-
- Felt – Dyeing and Felting Using a Form – Sample 5 – Felted Vessel
-
- Felt – Dyeing and Felting Using a Form – Sample 5 – Felted Vessel
-

- Felt – Dyeing and Felting Using a Form – Sample 5 – Felted Vessel
-
- Felt – Dyeing and Felting Using a Form – Sample 5 – Felted Vessel
-
- Felt – Dyeing and Felting Using a Form – Sample 5 – Felted Vessel
-
- Felt – Dyeing and Felting Using a Form – Sample 5 – Felted Vessel
-
- Felt – Dyeing and Felting Using a Form – Sample 5 – Felted Vessel
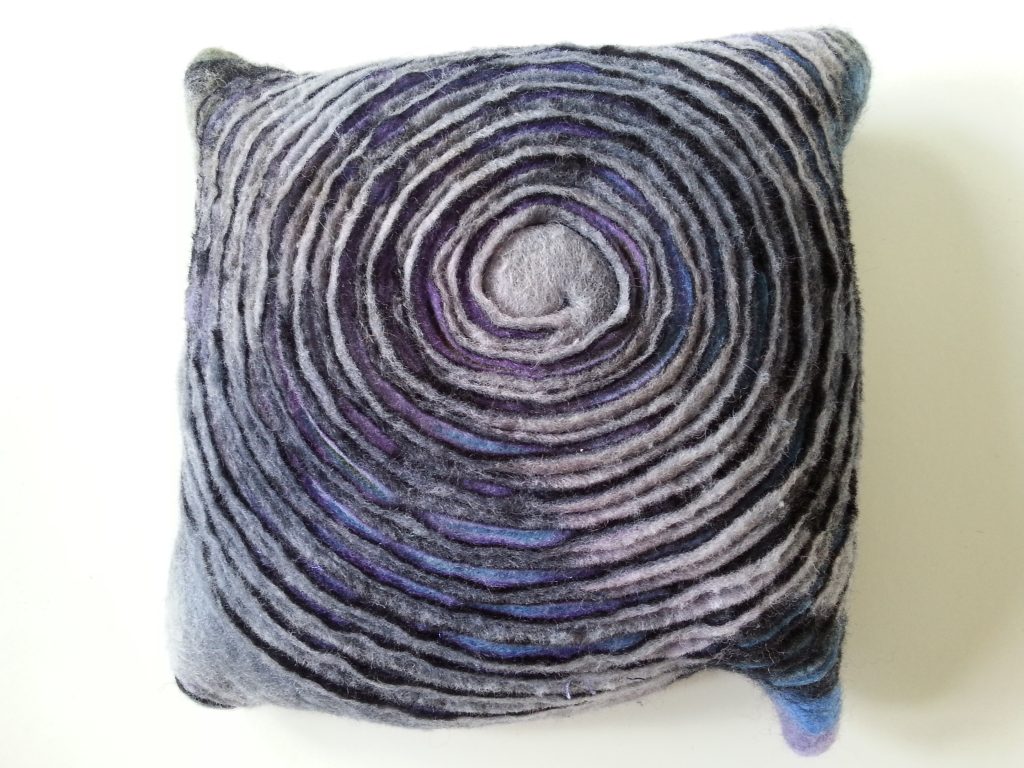
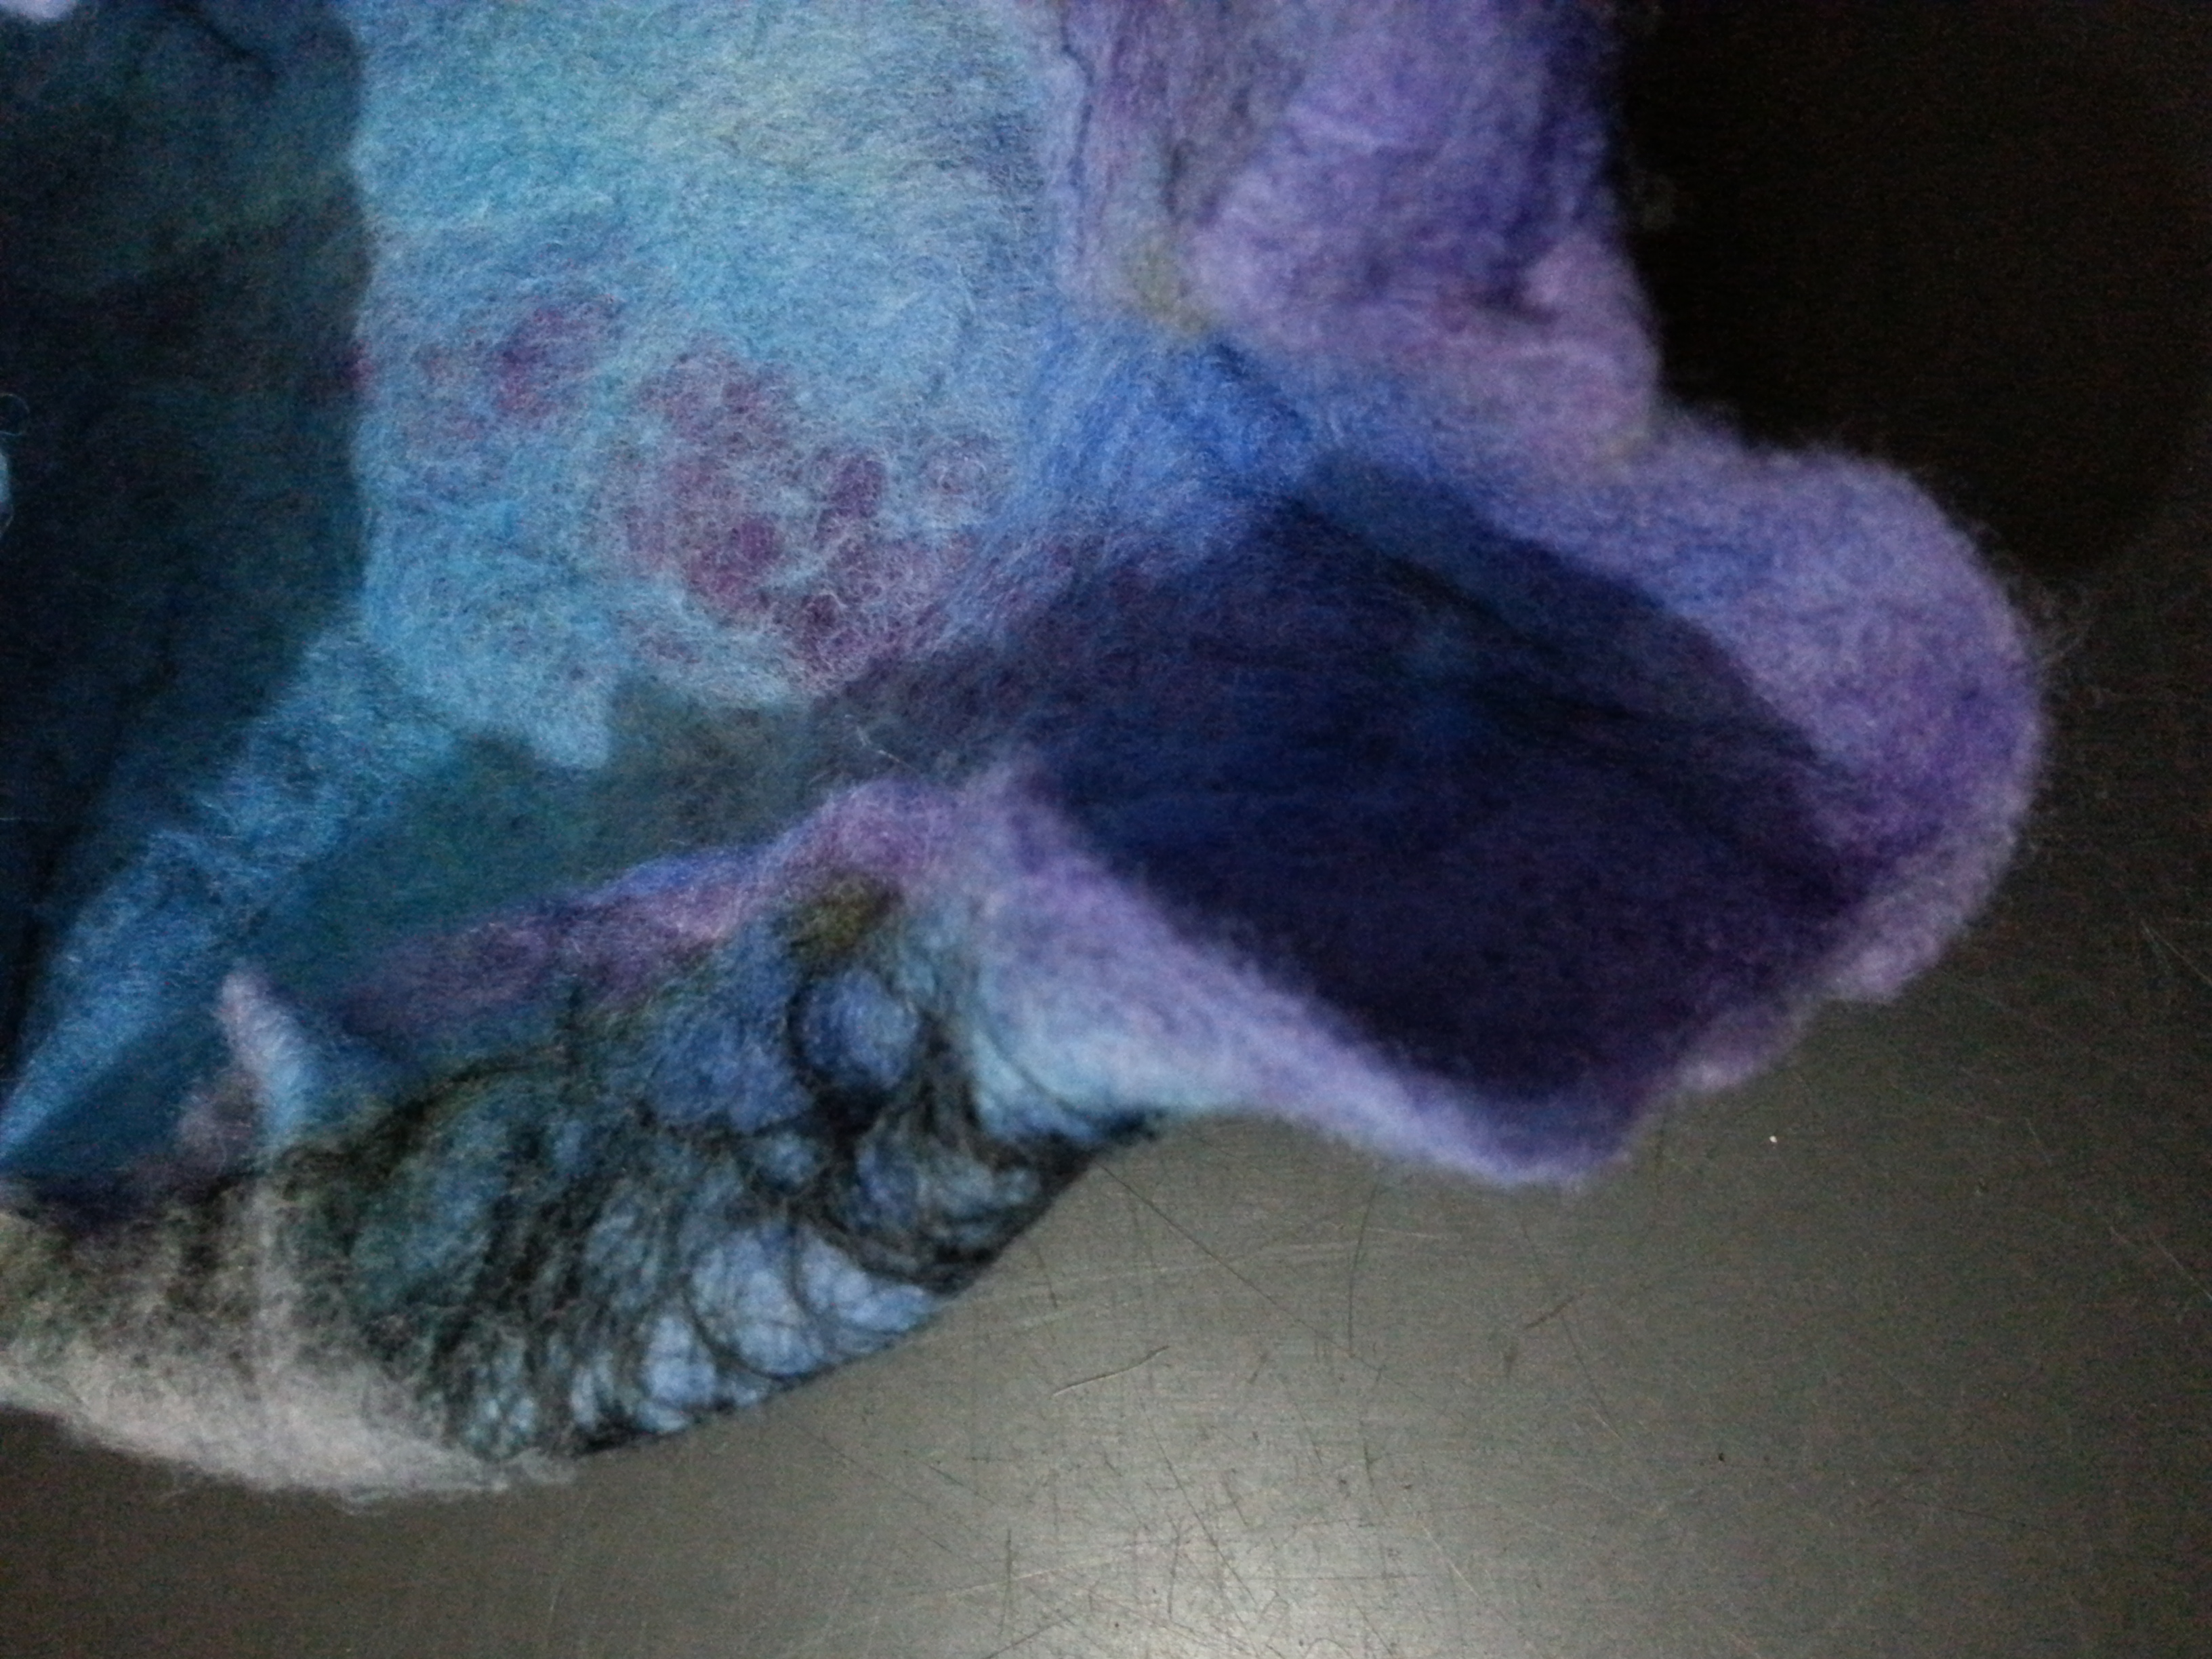
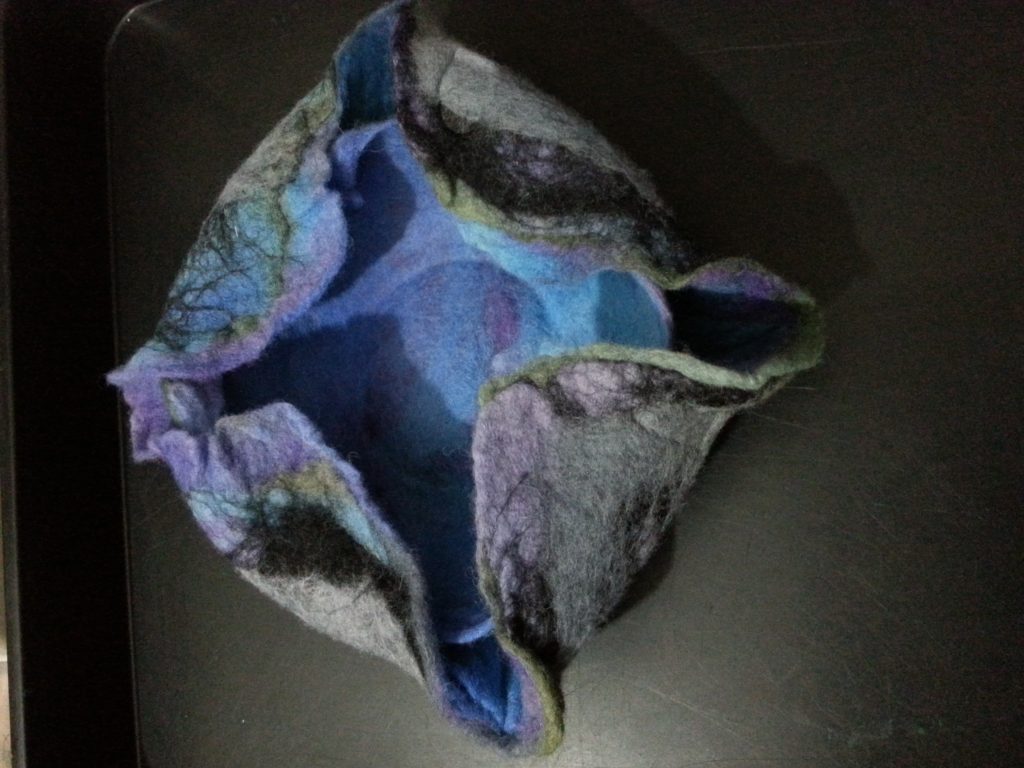
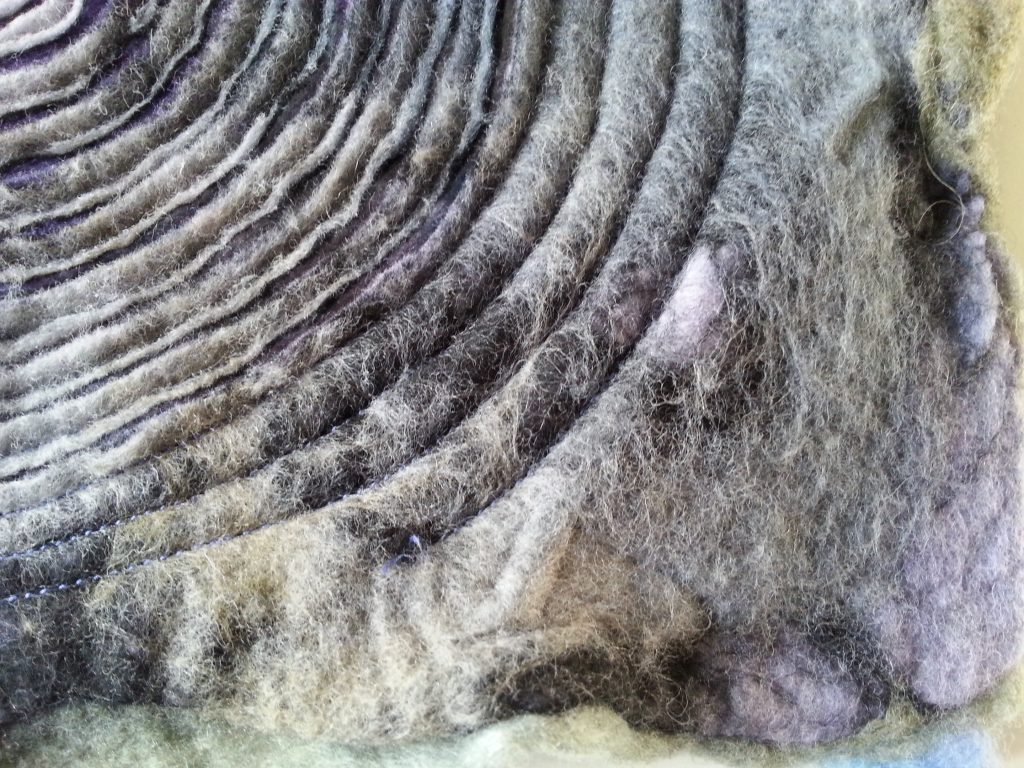
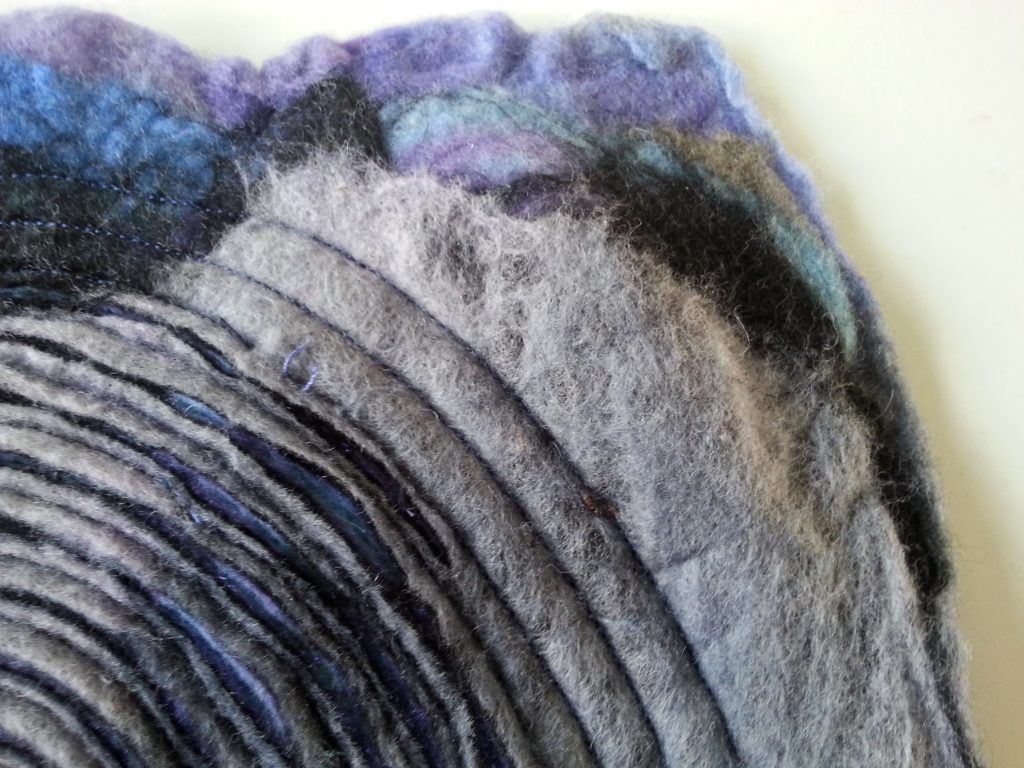
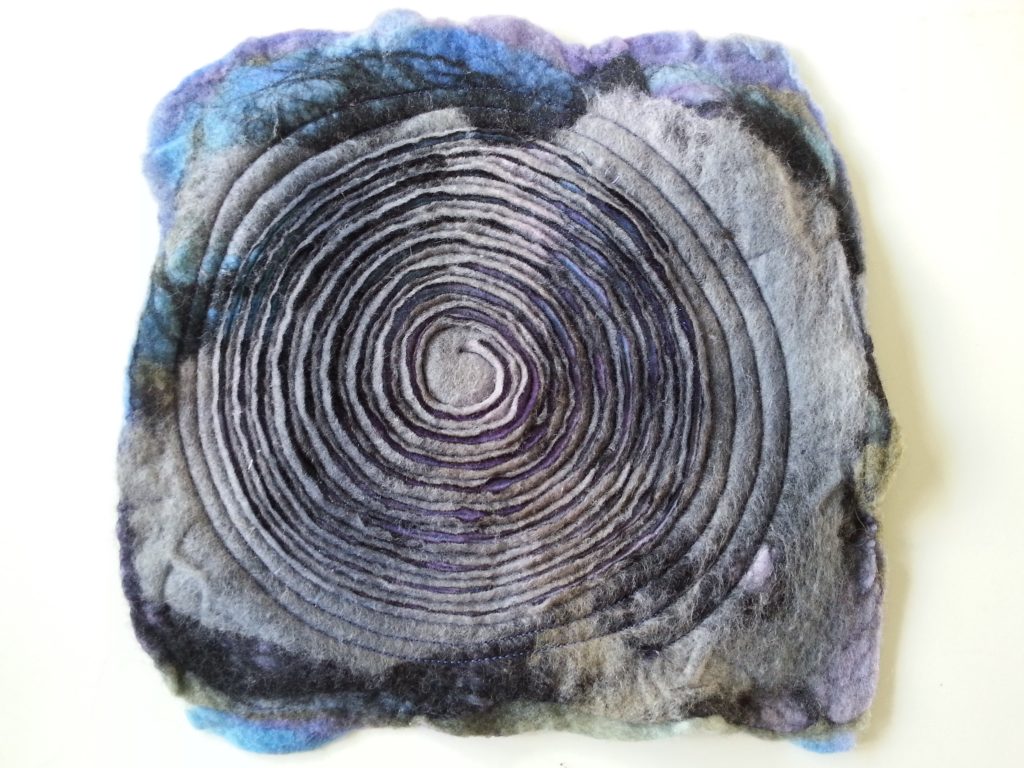
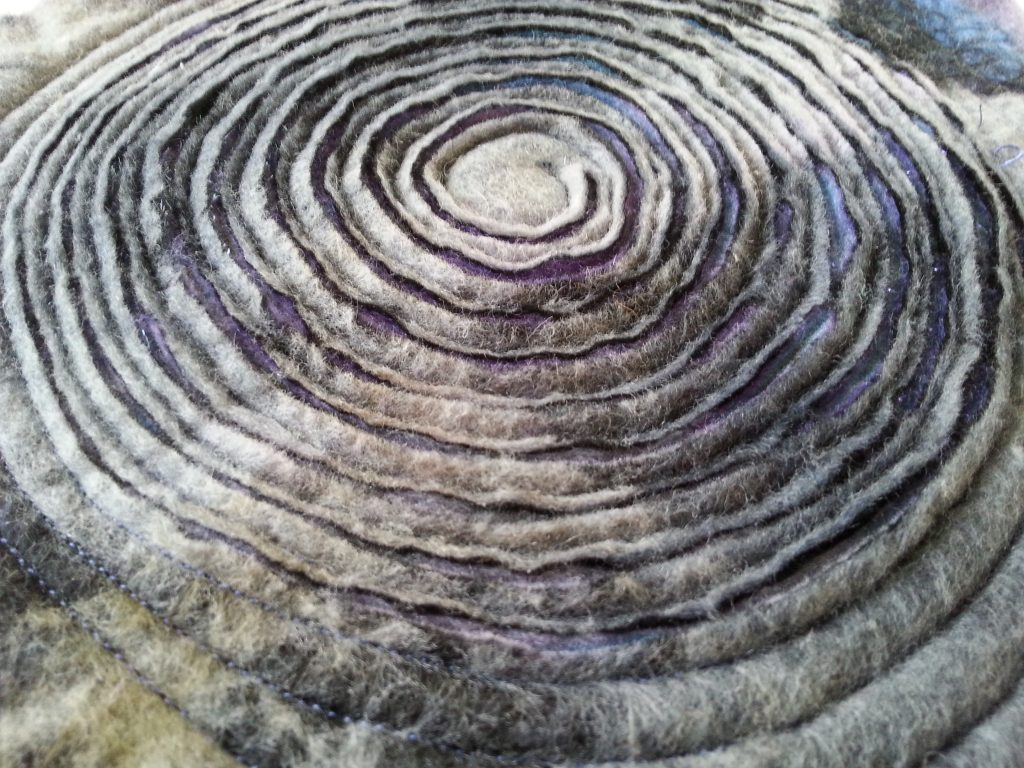
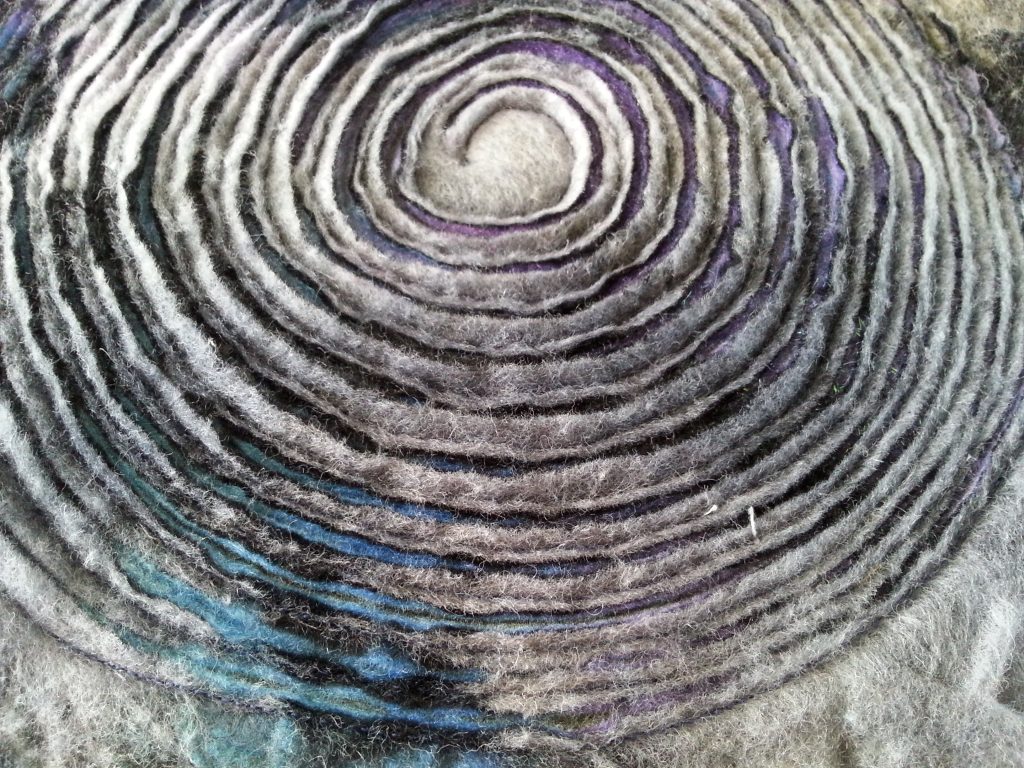
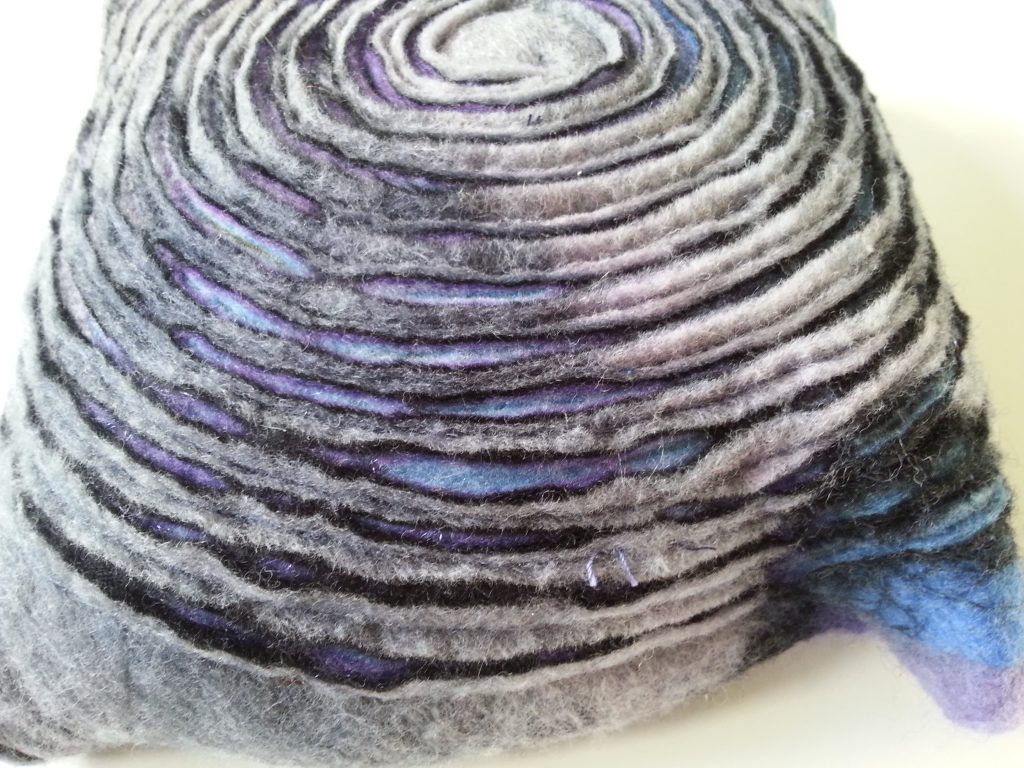
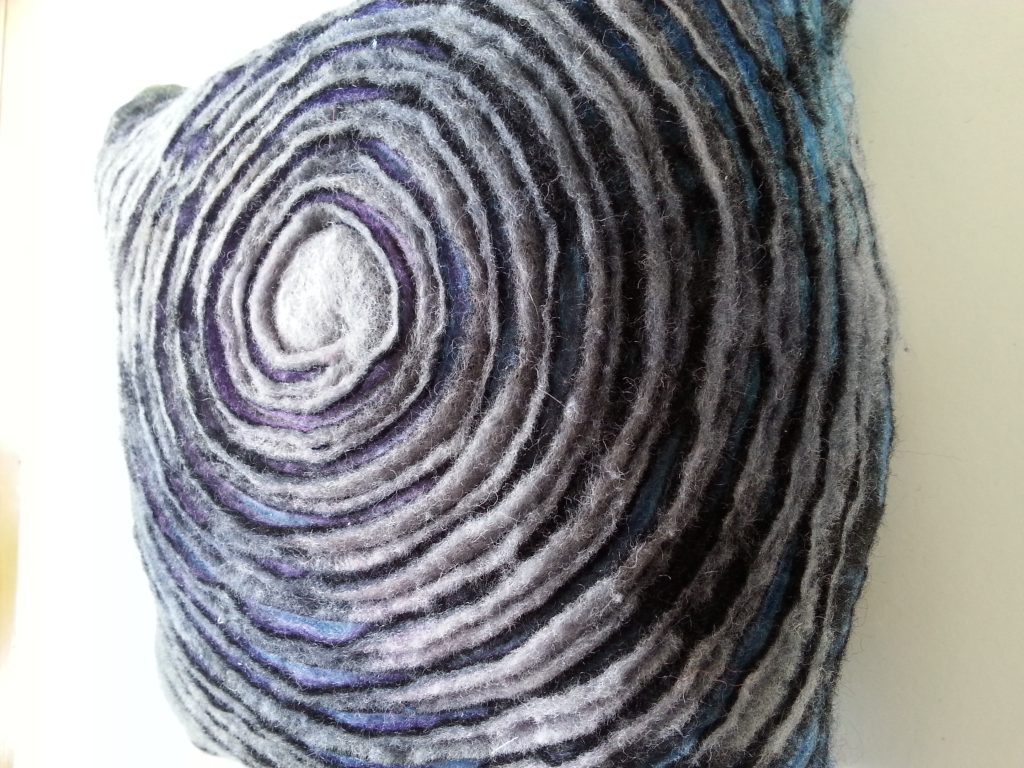
For this final part of the sample, I decided to use the cutting technique from sample one together with the spiral imagery. I stitched the second piece of flat felt with a large spiral then cut the spiral to reveal the lower layers. I used the thin felt bowl from sample 4 to create a lining and further shape and stiffen the bowl. I stitched the two layers together with invisible handstitching around the upper rim. Rather than cut the fabric, I formed the excess fabric into 4 pinched tucks. This gave the layers additional prominence on the outer edge of the bowl.
Outcome & Thoughts
I love the cut-felt spiral effect. The colours in the layers work well and the sections of different colour give exactly the shadowing/highlight effect I was hoping for. This could be further developed with a wider range of colours, concentric circles, stripes, graduating shades and so on. What is not so successful, however, is the placement – the best feature is effectively only visible from the underside! For the moment I intend to leave this piece as it is but may well unstitch the pieces and re-use them elsewhere. Viewed upside down, for example, the spiral face would make an attractive cushion if backed by a piece of plain felt.
Sampling – Conclusion
Having undertaken a critical review of these samples and those from the first part of Stage 3 I am satisfied that felt is the right way to go for texture, flexibility of material and colour. I have not definitively concluded as to whether to go with natural tones or to go with my more familiar bold colour palette. I may make a couple more small samples to test this before deciding. The research and imagery have given me a wealth of inspiration and have led to some positive outcomes. I feel that I have drawn valuable information and ideas from the artists’ work and have been able to practice and refine my own techniques whilst working on some exciting crossovers like using chenille with felt. Sampling has been very effective in ruling in/out various options and I feel confident in moving forward to the prototype stage.